Transforming Objects
This chapter covers how to position, scale, rotate, and arrange objects in your animations. All classes inheriting from MathObject support these transformations, and most methods return the object itself, enabling method chaining.
Table of Contents
- Positioning Objects
- Shift
- MoveTo
- Stack
- Stack to Screen
- Aligning Objects
- Scaling Objects
- Rotating Objects
- Affine Transforms
- Isomorphic Transformations
- Reflections
- General Affine Transforms
- Layouts
- BoxLayout
- SpiralLayout
- HeapLayout
- PascalLayout
- FlowLayout
- Composing Layouts
Positioning Objects
Shift
The shift() method moves an object by a specified vector, adding the vector to the object's current position.
Basic Usage
// Shift using a Vec object
def circle = Shape.circle().shift(Vec.to(1, 1))  // Center at (1, 1)

// Shift using x, y coordinates (simpler)
def square = Shape.square().shift(-3, 0)  // Lower-left at (-3, 0)

// Shift using a Point
def pentagon = Shape.regularPolygon(5).shift(Point.at(2, -1))
Method Chaining: Since shift() returns the object, you can chain operations:
def shape = Shape.circle()
    .shift(1, 0)      // Move right
    .shift(0, 1)      // Then move up
    .scale(2)         // Then scale
MoveTo
The moveTo() method positions an object so its center aligns with specific coordinates. Unlike shift(), which is relative, moveTo() sets an absolute position.
// Move center to (3, 3)
def pentagon = Shape.regularPolygon(5).moveTo(3, 3)

// Alternative with Point
def circle = Shape.circle().moveTo(Point.at(-1, 2))
Understanding Centers:
- moveTo() uses the bounding box center
- For regular polygons, this may differ from the geometric center
- Use .getCentroid() for true geometric center if needed
Equivalence: moveTo(p) is equivalent to .stack().toPoint(p)
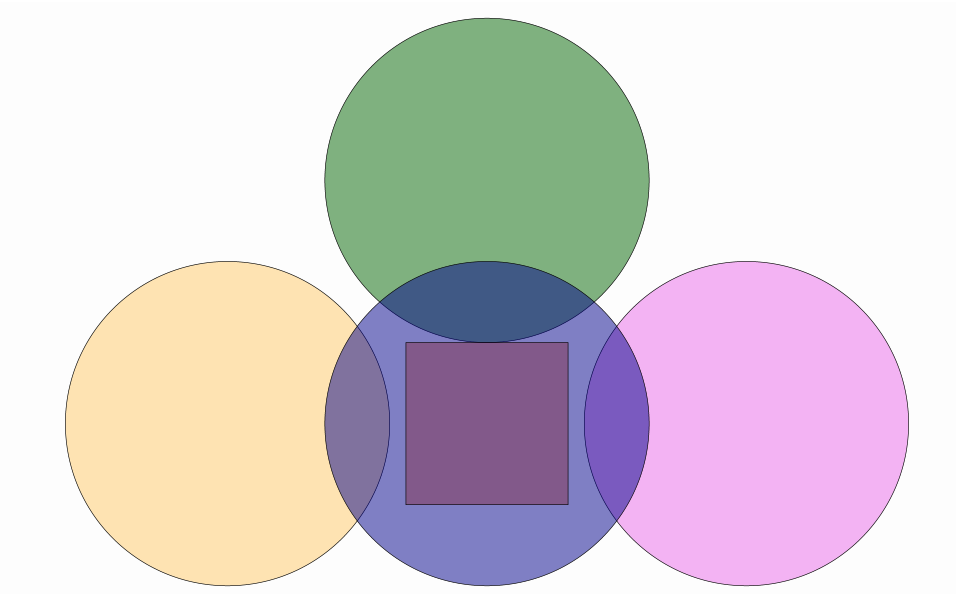
Stack
The stack() method provides powerful relative positioning, allowing you to place objects relative to other objects with precise control over anchors and gaps.
Basic Stacking
def circle1 = Shape.circle().fillColor("orange").fillAlpha(0.3)
def circle2 = circle1.copy().fillColor("violet").fillAlpha(0.6)
def circle3 = circle1.copy().fillColor("darkgreen").fillAlpha(0.5)
def circle4 = circle1.copy().fillColor("darkblue").fillAlpha(0.5)
def square = Shape.square().fillColor("darkred").fillAlpha(0.3)

// Stack circle1 to the LEFT of square
circle1.stack()
    .withGaps(0.1)
    .withDestinyAnchor(AnchorType.LEFT)
    .toObject(square)

// Stack circle2 to the RIGHT of square
circle2.stack()
    .withGaps(0.1)
    .withDestinyAnchor(AnchorType.RIGHT)
    .toObject(square)

// Stack circle3 ABOVE square
circle3.stack()
    .withDestinyAnchor(AnchorType.UPPER)
    .toObject(square)

// Stack circle4 at CENTER of square (default)
circle4.stack().toObject(square)

scene.add(circle1, circle2, circle3, circle4, square)
camera.adjustToAllObjects()
Stack Method Chain
The stack() method returns a StackUtils object that allows you to configure positioning:
object.stack()
    // Configuration methods (optional)
    .withOriginAnchor(AnchorType anchor)
    .withDestinyAnchor(AnchorType anchor)
    .withGaps(double gap)
    .withRelativeGaps(double gap)

    // Finalization method (required, choose one)
    .toPoint(coordinates)
    .toObject(object)
    .toScreen(screenAnchor)
Configuration Methods
Anchor Methods:
// Specify where on the destination to attach (optional, default CENTER)
.withDestinyAnchor(AnchorType.RIGHT)

// Specify which part of the object to attach (optional)
.withOriginAnchor(AnchorType.LEFT)
If origin anchor is not specified, it defaults to the opposite of destiny anchor, for example:
RIGHTdestiny →LEFToriginUPPERdestiny →LOWERoriginCENTERdestiny →CENTERorigin
Available Anchor Types:
- Cardinal: LEFT, RIGHT, UPPER, LOWER, CENTER
- Corners: UPPER_LEFT, UPPER_RIGHT, LOWER_LEFT, LOWER_RIGHT
- Aligned: LEFT_AND_ALIGNED_UPPER, RIGHT_AND_ALIGNED_LOWER, etc.
Gap Methods:
// Absolute gaps in math units
.withGaps(0.1, 0.2)  // horizontal: 0.1, vertical: 0.2
.withGaps(0.1)       // both: 0.1

// Relative gaps (proportional to object size)
.withRelativeGaps(0.1, 0.2)  // 10% of width, 20% of height
.withRelativeGaps(0.1)       // 10% of both
Finalization Methods
Stack to Point:
// Position relative to specific coordinates
object.stack()
    .withGaps(0.1)
    .toPoint(Vec.to(1, 1))
Stack to Object:
// Position relative to another object
object.stack()
    .withDestinyAnchor(AnchorType.RIGHT)
    .toObject(targetObject)
Stack to Screen:
// Position relative to camera view
object.stack()
    .withGaps(0.2)
    .toScreen(ScreenAnchor.UPPER_LEFT)
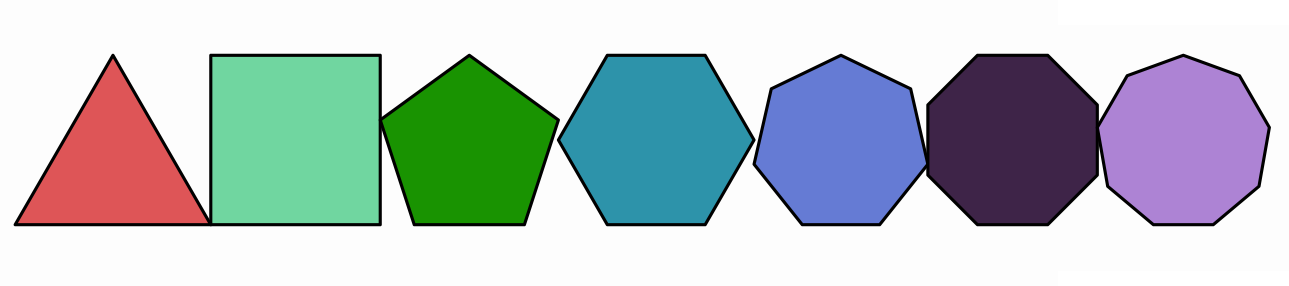
Example: Aligned Sequence
def previousPol = Shape.regularPolygon(3)
    .fillColor("random")
    .thickness(20)

scene.add(previousPol)

// Create a sequence of aligned polygons
for (int n = 4; n < 10; n++) {
    def pol = Shape.regularPolygon(n)
        .fillColor("random")
        .thickness(20)
        .stack()
        .withDestinyAnchor(AnchorType.LEFT_AND_ALIGNED_LOWER)
        .toObject(previousPol)

    scene.add(pol)
    previousPol = pol  // Next iteration uses this as reference
}

camera.adjustToAllObjects()
Tip: For complex layouts, consider using MathObjectGroup with layouts (covered later in this chapter).
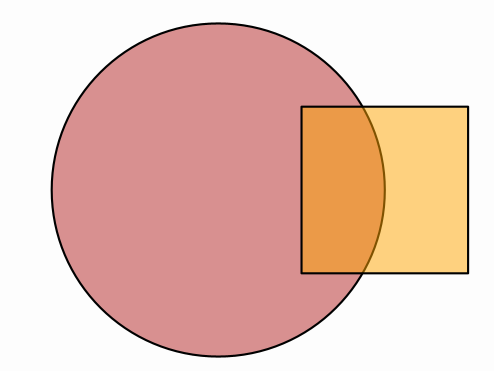
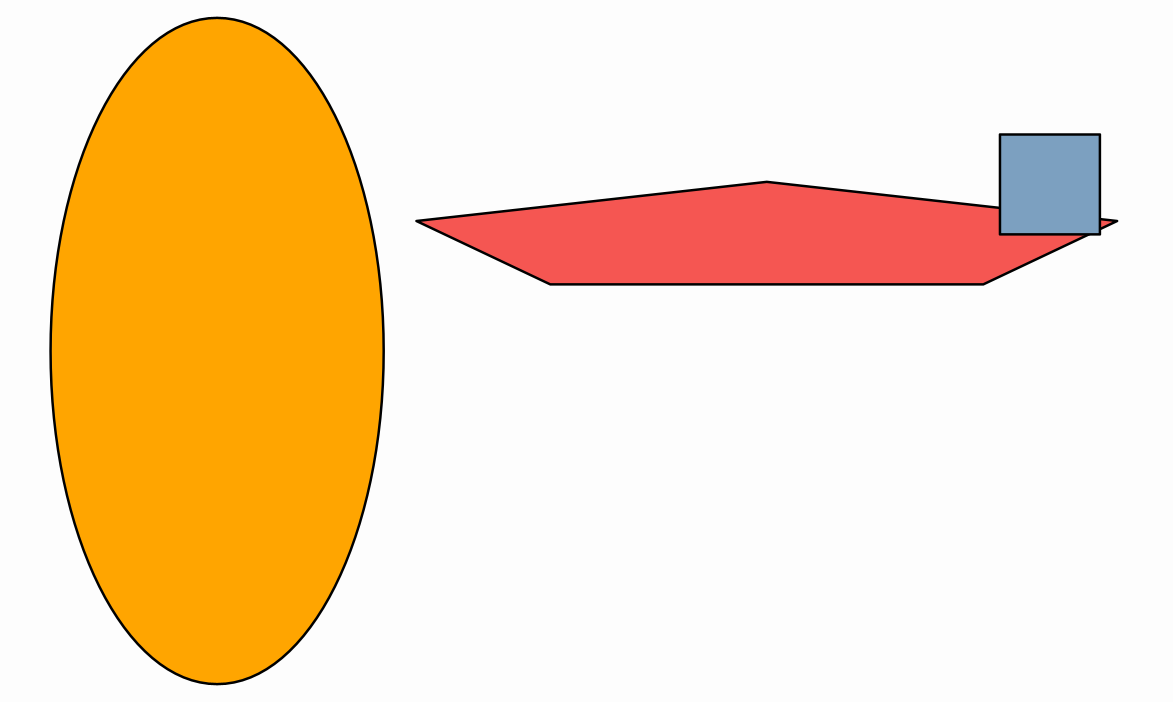
Advanced Stacking Example
// Stack with explicit origin and destiny anchors
def square = Shape.square()
    .scale(0.5)
    .thickness(8)
    .fillColor("orange")
    .fillAlpha(0.5)

def circle = Shape.circle()
    .scale(0.5)
    .thickness(8)
    .fillColor("firebrick")
    .fillAlpha(0.5)

scene.add(circle, square)

// Square's CENTER goes to circle's RIGHT
square.stack()
    .withOriginAnchor(AnchorType.CENTER)
    .withDestinyAnchor(AnchorType.RIGHT)
    .toObject(circle)
Stack to Screen
Position objects relative to the current camera view using toScreen().
def square1 = Shape.square().scale(0.5).style("solidblue")
def square2 = Shape.square().scale(0.5).style("solidgreen")
def circle1 = Shape.circle().style("solidred").scale(0.25)
def circle2 = Shape.circle().style("solidorange").scale(0.25)

// Square touching left edge
square1.stack()
    .toScreen(ScreenAnchor.LEFT)

// Square at right edge with gap
square2.stack()
    .withGaps(0.3)
    .toScreen(ScreenAnchor.RIGHT)

// Circle's center at upper-left corner
circle1.stack()
    .withOriginAnchor(AnchorType.CENTER)
    .toScreen(ScreenAnchor.UPPER_LEFT)

// Circle's bottom at lower-right corner
circle2.stack()
    .withOriginAnchor(AnchorType.LOWER)
    .toScreen(ScreenAnchor.LOWER_RIGHT)

scene.add(square1, square2, circle1, circle2)

Available Screen Anchors:
- Edges: LEFT, RIGHT, UPPER, LOWER
- Corners: UPPER_LEFT, UPPER_RIGHT, LOWER_LEFT, LOWER_RIGHT
- Center: CENTER
Shortcut for Centering:
// These are equivalent:
object.center()
object.stack().toScreen(ScreenAnchor.CENTER)
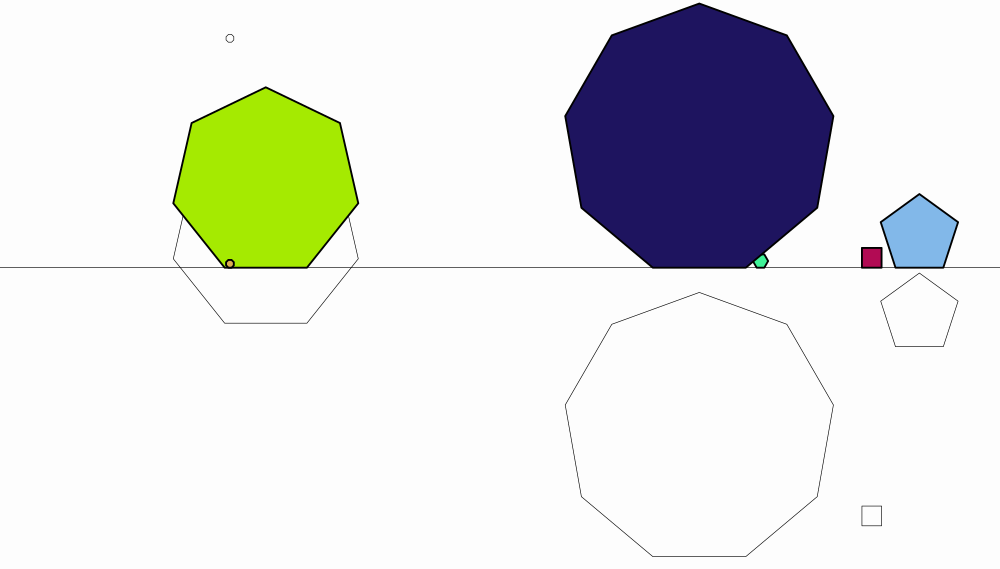
Aligning Objects
The align() method aligns one object with another using a specific alignment type.
def floor = Line.XAxis()
scene.add(floor)

// Create random polygons and align them to the floor
for (n in 4..9) {
    def pol = Shape.regularPolygon(n)
        .moveTo(Point.random())
        .scale(Math.random() * 0.5)

    def pol2 = pol.copy()
        .fillColor("random")
        .thickness(6)
        .align(floor, AlignType.LOWER)  // Align bottom to floor

    scene.add(pol, pol2)
}

camera.adjustToAllObjects()
Available Alignment Types:
- LEFT - Align left edges
- RIGHT - Align right edges
- UPPER - Align top edges
- LOWER - Align bottom edges
- HCENTER - Align horizontal centers
- VCENTER - Align vertical centers
Comparison: Stack vs Align
| Method | Use Case |
|---|---|
.stack() |
Position with gaps, multiple anchor options, flexible |
.align() |
Simple edge/center alignment, no gaps |
Scaling Objects
All MathObject instances can be scaled uniformly or non-uniformly. Scaling can be performed around a specific center or the object's bounding box center.
Basic Scaling
// Uniform scaling (all dimensions by same factor)
def circle = Shape.circle().scale(2)  // 2× larger

// Non-uniform scaling (different x and y factors)
def ellipse = Shape.circle().scale(0.5, 1)  // Ellipse: 50% width, 100% height

// Scaling around a specific point
def pentagon = Shape.regularPolygon(5)
    .shift(0, 1)
    .scale(Point.at(0, 0), 1.3, 0.2)  // Scale around origin
Detailed Example
// Circle scaled to ellipse
def s1 = Shape.circle()
    .style("solidorange")
    .shift(-1, 0)
    .scale(0.5, 1)  // 50% width, 100% height

// Pentagon scaled around origin
def s2 = Shape.regularPolygon(5)
    .style("solidred")
    .shift(0, 1)
    .scale(Point.at(0, 0), 1.3, 0.2)

// Square uniformly scaled
def s3 = Shape.square()
    .style("solidblue")
    .shift(1, 0)
    .scale(0.3)  // 30% of original size

scene.add(s1, s2, s3)
Scale Center Behavior
Default: If no center is specified, objects scale around their bounding box center.
// These are equivalent when object is at origin:
shape.scale(2)
shape.scale(shape.getCenter(), 2)
Custom center: Specify a point to create different scaling effects:
// Scale away from origin
shape.scale(Point.origin(), 2, 1)

// Scale around top-right corner
def corner = shape.getBoundingBox().getUpperRight()
shape.scale(Point.at(corner), 1.5)
Rotating Objects
The rotate() method rotates objects by a specified angle. Rotation can be around a custom center or the object's bounding box center.
Basic Rotation
// Rotate around object's center
def square = Shape.square().rotate(45 * DEGREES)

// Rotate around a specific point
def ellipse = Shape.circle()
    .scale(0.5, 1)
    .rotate(Vec.to(0.5, 0), 30 * DEGREES)
Note: Always use * DEGREES to convert degree values to radians, as all angle methods expect radians.
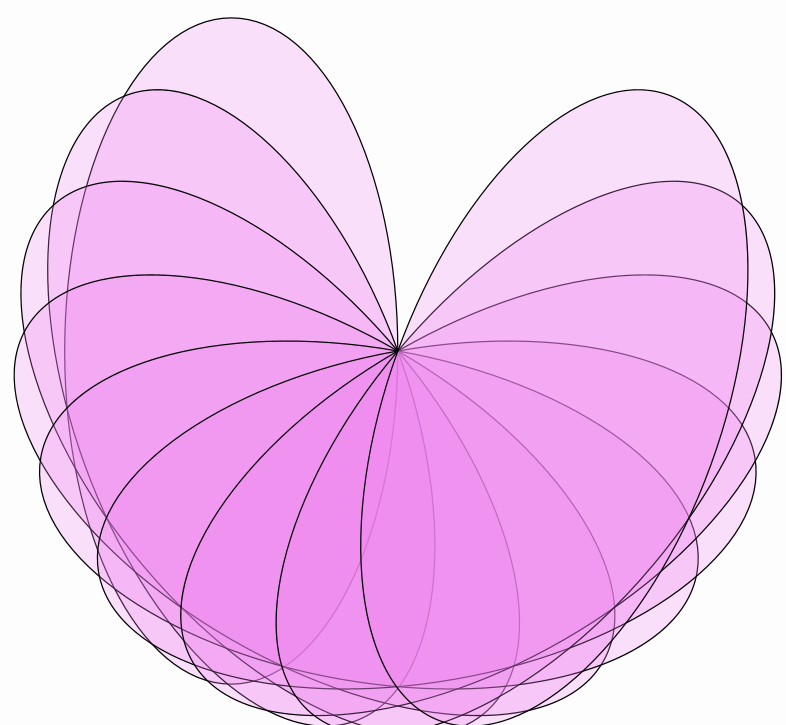
Example
def ellipse = Shape.circle()
    .scale(0.5, 1)
    .fillColor("violet")
    .fillAlpha(0.25)

def rotationCenter = Vec.to(0.5, 0)

// Create spirograph pattern
for (int n = 0; n < 180; n += 20) {
    scene.add(
        ellipse.copy()
            .rotate(rotationCenter, n * DEGREES)
    )
}
Rotation Behavior
Default center: If not specified, rotation occurs around the bounding box center:
// These are equivalent:
shape.rotate(45 * DEGREES)
shape.rotate(shape.getCenter(), 45 * DEGREES)
Affine Transforms
Affine transformations are the mathematical foundation for shift, rotate, and scale operations. The AffineJTransform class provides advanced transformation capabilities for complex positioning and animation.
Understanding Affine Transforms
An affine transform is a geometric transformation that:
- Preserves parallel lines
- Preserves ratios of distances along lines
- Can combine translation, rotation, scaling, shearing, and reflection
Transform Application Methods
// Modify the original object
transform.applyTransform(object)  // Returns void

// Create a transformed copy
def newObject = transform.getTransformedObject(object)  // Original unchanged
Basic Transform Constructors
// Translation
def translateTransform = AffineJTransform.createTranslationTransform(Vec.to(1, 2))
translateTransform.applyTransform(object)// Equivalent to: object.shift(1, 2)

// Rotation
def rotateTransform = AffineJTransform.create2DRotationTransform(
    Point.origin(),
    45 * DEGREES
)
rotateTransform.applyTransform(object)// Equivalent to: object.rotate(Point.origin(), 45 * DEGREES)

// Scaling
def scaleTransform = AffineJTransform.createScaleTransform(
    Point.origin(),
    2.0,      // x scale
    1.5,      // y scale
    1.0       // z scale (for future 3D support)
)
scaleTransform.applyTransform(object)// Equivalent to: object.scale(Point.origin(), 2, 1.5)
Isomorphic Transformations
Isomorphic transforms preserve shape and proportions but may change size, position, and orientation. They combine translation, rotation, and uniform scaling.
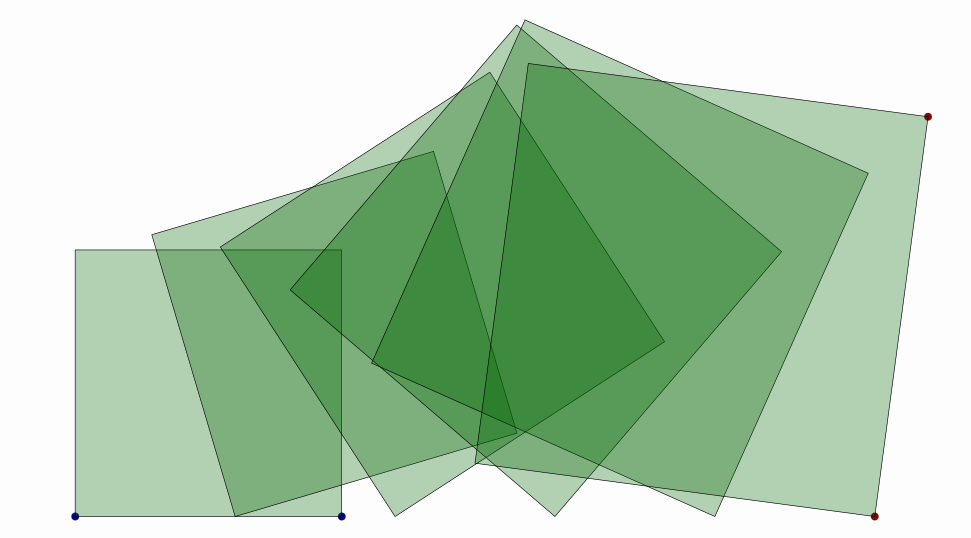
Direct Isomorphic Transform
Maps two points to two other points using the unique direct (orientation-preserving) isomorphic transform.
def square = Shape.square()
    .shift(-1.5, -1)
    .fillColor("darkgreen")
    .fillAlpha(0.3)

// Define source points
def A = square.getPoint(0).drawColor("darkblue")  // Lower-left
def B = square.getPoint(1).drawColor("darkblue")  // Lower-right

// Define destination points
def C = Point.at(1.5, -1).drawColor("darkred")
def D = Point.at(1.7, 0.5).drawColor("darkred")

scene.add(A, B, C, D)

// Create interpolated transforms (alpha from 0 to 1)
(0..5).each {//For it=0,1,2,3,4,5 do...
    double alpha=it/5.0
    def transform = AffineJTransform.createDirect2DIsomorphic(
        A, B,     // Source points
        C, D,     // Destination points
        alpha     // Interpolation factor
    )
    scene.add(transform.getTransformedObject(square))
}
Understanding Alpha Parameter:
alpha = 0→ Identity transform (no change)alpha = 1→ Full transform (A→C, B→D)0 < alpha < 1→ Intermediate transforms (interpolated)
Use cases:
- Smooth morphing animations
- Coordinated object movements
- Preserving proportions while repositioning
Inverse Isomorphic Transform
Creates an orientation-reversing transform (includes reflection).
// Create large R from LaTeX
def bigR = LatexMathObject.make("R").get(0)
    .scale(8)
    .center()
    .fillColor("steelblue")
    .fillAlpha(0.3)

def bbox = bigR.getBoundingBox()

// Source points
def A = Point.at(bbox.getLowerLeft()).drawColor("darkblue")
def B = Point.at(bbox.getUpperLeft()).drawColor("darkblue")

// Destination points
def C = Point.at(3.5, -1).drawColor("darkred")
def D = Point.at(3.7, 0.5).drawColor("darkred")

scene.add(A, B, C, D)

// Create inverse isomorphic transform sequence
(0..5).each {//For it=0,1,2,3,4,5 do...
    double alpha=it/5.0
    def transform = AffineJTransform.createInverse2DIsomorphic(
        A, B, C, D, alpha
    )
    scene.add(transform.getTransformedObject(bigR))
}

camera.adjustToAllObjects()
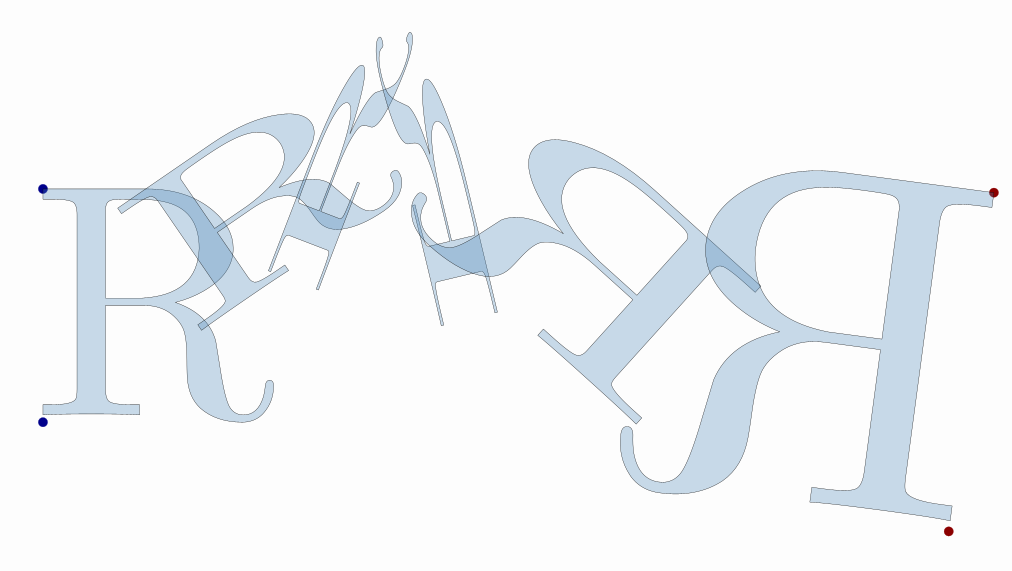
Key difference: Inverse transforms include reflection, flipping the orientation of objects.
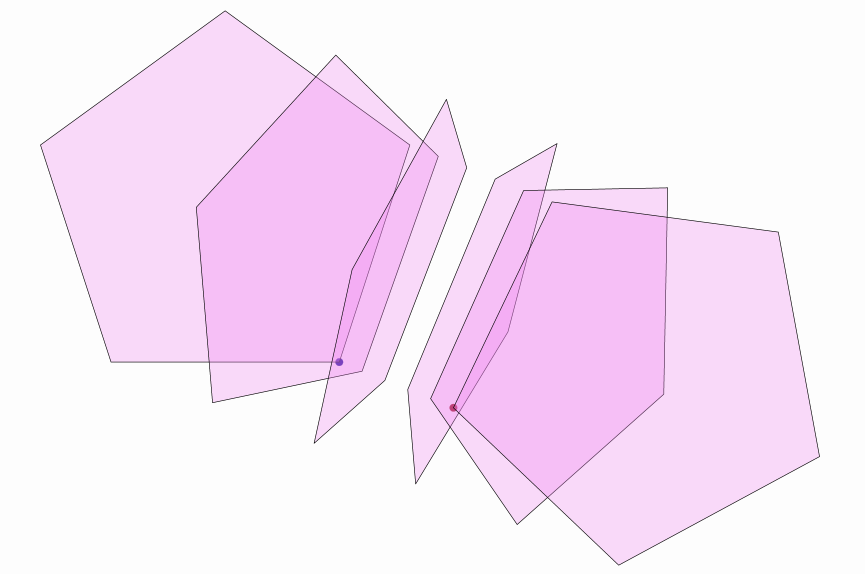
Reflections
Create mirror reflections across lines defined by two methods:
Reflection by Point Mapping
Reflects so that point A maps to point B (reflection axis is the perpendicular bisector).
def pentagon = Shape.regularPolygon(5)
    .fillColor("violet")
    .fillAlpha(0.3)

def A = pentagon.getPoint(0).copy().drawColor("darkblue")
def B = A.copy().shift(0.5, -0.2).drawColor("darkred")

scene.add(A, B)

// Create reflection sequence
(0..5).each {//For it=0,1,2,3,4,5 do...
    double alpha=it/5.0
    def transform = AffineJTransform.createReflection(A, B, alpha)
    scene.add(transform.getTransformedObject(pentagon))
}

camera.adjustToAllObjects()
Reflection by Axis
Reflects across a line defined by two points.
def square = Shape.square().fillColor("orange").fillAlpha(0.3)

// Define reflection axis
def E1 = Point.at(-1, -1).drawColor("blue")
def E2 = Point.at(1, 1).drawColor("blue")

scene.add(square, E1, E2)

// Add visual axis line
scene.add(Line.make(E1, E2).drawColor("blue").dashStyle(DashStyle.DASHED))

// Create reflection
def transform = AffineJTransform.createReflectionByAxis(E1, E2, 1.0)
scene.add(transform.getTransformedObject(square))

camera.adjustToAllObjects()
Choosing the right method:
- Use createReflection(A, B, alpha) when you know where a point should map to
- Use createReflectionByAxis(E1, E2, alpha) when you know the reflection line
General Affine Transforms
The most general affine transform maps three non-collinear points to three other points.
def square = Shape.square()
    .drawColor("brown")
    .thickness(4)

def circle = Shape.circle()
    .scale(0.5)
    .shift(0.5, 0.5)
    .fillColor("orange")
    .fillAlpha(0.1)

// Source triangle (vertices of square)
def A = Point.at(0, 0).drawColor("darkblue").layer(1)
def B = Point.at(1, 0).drawColor("darkblue").layer(1)
def C = Point.at(0, 1).drawColor("darkblue").layer(1)

// Destination triangle
def D = Point.at(1.5, -0.5)
    .dotStyle(DotStyle.PLUS)
    .thickness(6)
    .drawColor("darkgreen")
def E = Point.at(2, 0)
    .dotStyle(DotStyle.PLUS)
    .thickness(6)
    .drawColor("darkgreen")
def F = Point.at(1.75, 0.75)
    .dotStyle(DotStyle.PLUS)
    .thickness(6)
    .drawColor("darkgreen")

scene.add(square, circle, A, B, C, D, E, F)

// Create transformation sequence
(0..5).each {//For it=0,1,2,3,4,5 do...
    double alpha=it/5.0
    def transform = AffineJTransform.createAffineTransformation(
        A, B, C,    // Source triangle
        D, E, F,    // Destination triangle
        alpha
    )
    scene.add(transform.getTransformedObject(square))
    scene.add(transform.getTransformedObject(circle))
}

camera.adjustToAllObjects()
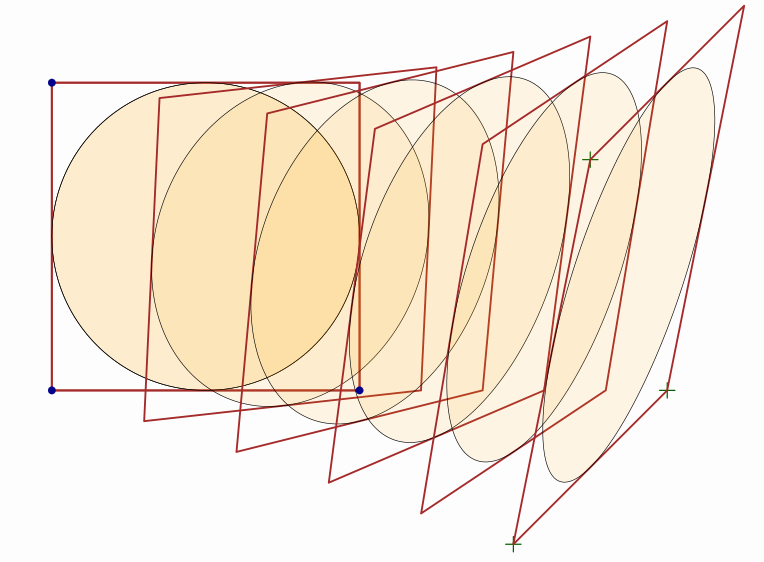
Important: The three source points (A, B, C) must not be collinear (not on the same line), and the same applies to destination points (D, E, F).
Layouts
Layouts automatically arrange multiple objects in MathObjectGroup instances. They're essential for creating organized, visually appealing arrangements.
Basic Layout Usage
def group = MathObjectGroup.make(obj1, obj2, obj3)
group.setLayout(LayoutType.LOWER, 0.1, 0.1)  // Type, horizontal gap, vertical gap
Standard Layout Types
The LayoutType enum provides several built-in layouts:
Cardinal Directions:
- CENTER - Stack centered
- LEFT - Align left edges
- RIGHT - Align right edges
- UPPER - Align top edges
- LOWER - Align bottom edges
Corner Alignments:
- URIGHT, DRIGHT - Align upper/lower with right edges
- ULEFT, DLEFT - Align upper/lower with left edges
- LUPPER, RUPPER - Align left/right with top edges
- LLOWER, RLOWER - Align left/right with bottom edges
Diagonal Arrangements:
- DIAG1 - 45° diagonal (upper-right)
- DIAG2 - 135° diagonal (upper-left)
- DIAG3 - 225° diagonal (lower-left)
- DIAG4 - 315° diagonal (lower-right)
Layout Demonstration
def group = MathObjectGroup.make()

// Create 10 squares of increasing size
double totalHeight = 0
(0..<10).each { //internal variable it goes from 0 to 9
    def square = Shape.square()
        .scale(0.2 + 0.1 * it)
        .thickness(6)
        .fillColor("random")
        .fillAlpha(0.5)

    totalHeight += square.getHeight()
    group.add(square)
}

// Zoom to fit all layouts
camera.scale(2 * totalHeight / camera.getMathView().getHeight())

scene.add(group)

def layoutName = LatexMathObject.make(".").scale(7)
scene.add(layoutName)

// Cycle through all layouts
for (layout in LayoutType.values()) {
    group.setLayout(layout, 0.1)

    layoutName.setLatex(layout.name())
        .stack()
        .withRelativeGaps(0.2)
        .toScreen(ScreenAnchor.LOWER)

    scene.waitSeconds(1)
}
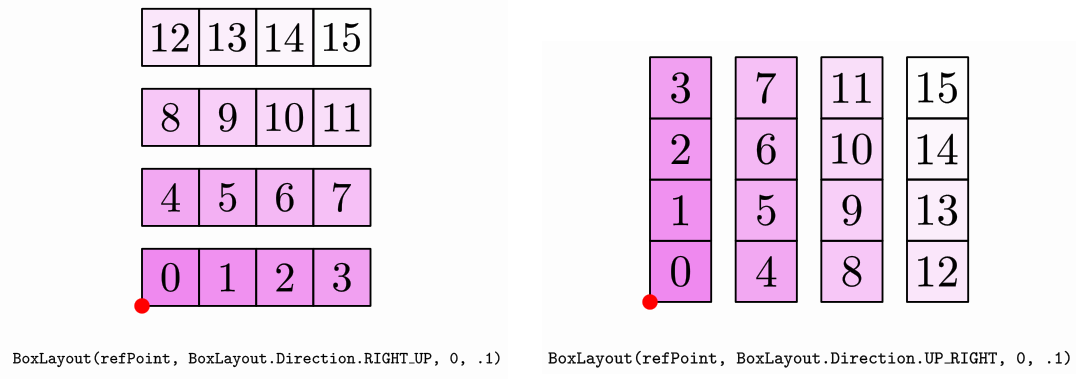
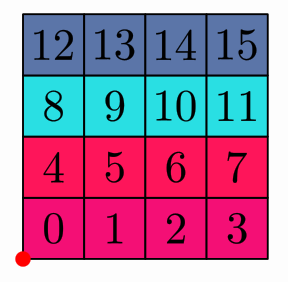
The BoxLayout
Arranges objects in a grid/matrix pattern with configurable direction and dimensions.
def numBoxes = 16
def group = MathObjectGroup.make()

(0..<numBoxes).each { n ->
    def square = Shape.square()
            .scale(0.25)
            .fillColor("violet")
            .fillAlpha(1 - (n + 1) / numBoxes)
            .thickness(6)

    def text = LatexMathObject.make("$n")
            .stack()
            .toObject(square)
            .layer(1)

    //Creates a group with square and text
    squareWithNumber = MathObjectGroup.make(square, text)

    //Add it as an element of the whole group
    group.add(squareWithNumber)
}

def refPoint = Point.origin()
        .thickness(40)
        .layer(1)
        .drawColor("red")

scene.add(refPoint)

def layout = BoxLayout.make(
        refPoint, //Starting reference point
        4, //Row size
        0.1, //Gap between row elements
        0.1 // Gap between rows
)

group.setLayout(layout)
scene.add(group)
camera.zoomToAllObjects()

Box Layout Directions
The setDirection() method controls fill order:
layout.setBoxDirection(BoxDirection.RIGHT_UP)  // Fill rows left→right, then down→up
layout.setBoxDirection(BoxDirection.LEFT_DOWN) // Fill rows right→left, then up→down
layout.setBoxDirection(BoxDirection.UP_RIGHT)  // Fill columns bottom→top, then left→right
Direction naming: [FIRST]_[SECOND]
- FIRST - Direction to fill the current row/column
- SECOND - Direction to move to next row/column
Working with Rows and Columns
// Access individual rows as groups
for (row in layout.getRowGroups(group)) {
    row.fillColor("random")  // Color each row differently
}

// Access individual columns
for (column in layout.getColumnGroups(group)) {
    column.drawColor("random")  // Color each column differently
}
The PathLayout
Arranges objects following a given path.
def numBoxes = 16
def group = MathObjectGroup.make()

(0..<numBoxes).each { n ->
    def square = Shape.square()
            .scale(0.25)
            .fillColor("violet")
            .fillAlpha(1 - (n + 1) / numBoxes)
            .thickness(6)

    def text = LatexMathObject.make("$n")
            .stack()
            .toObject(square)
            .layer(1)

    //Creates a group with square and text
    squareWithNumber = MathObjectGroup.make(square, text)

    //Add it as an element of the whole group
    group.add(squareWithNumber)
}

def path = Shape.circle()
        .scale(1, 2)
        .rotate(-45 * DEGREES)
        .drawColor("olivedrab4")

scene.add(path, group.setLayout(PathLayout.make(path)))
camera.zoomToAllObjects()
Gives the following result:
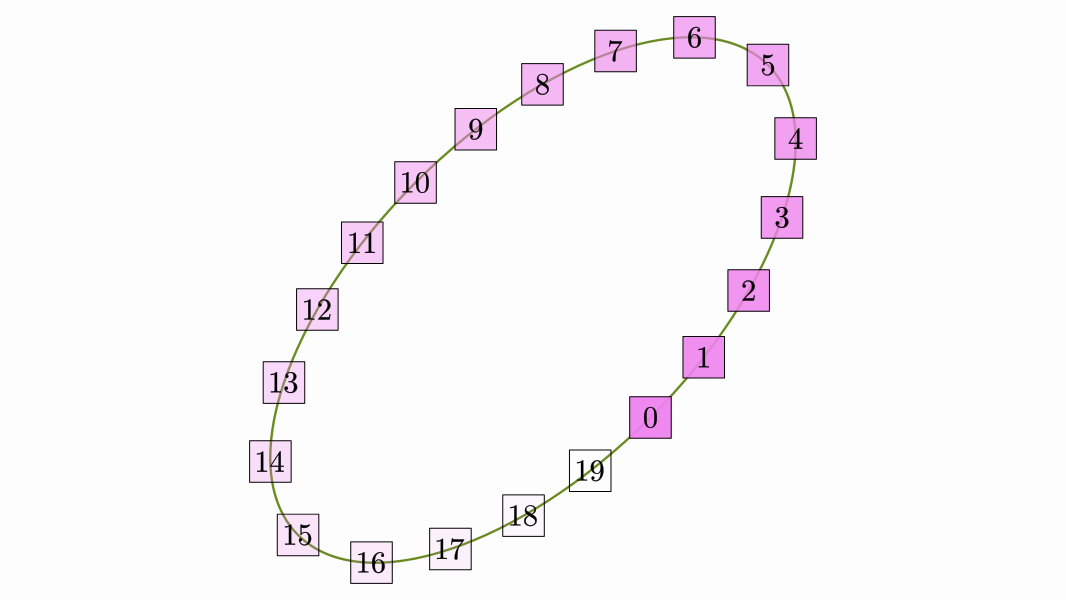
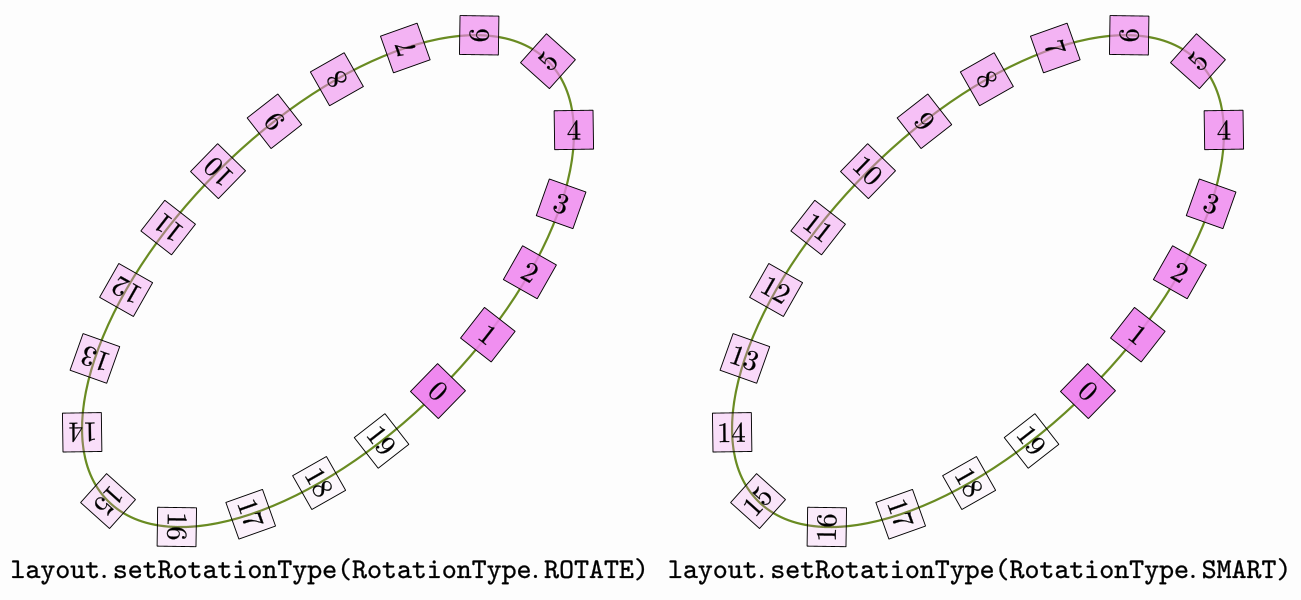
By default, objects are not rotated following the path. You can set this behaviour with the .setRotationType method
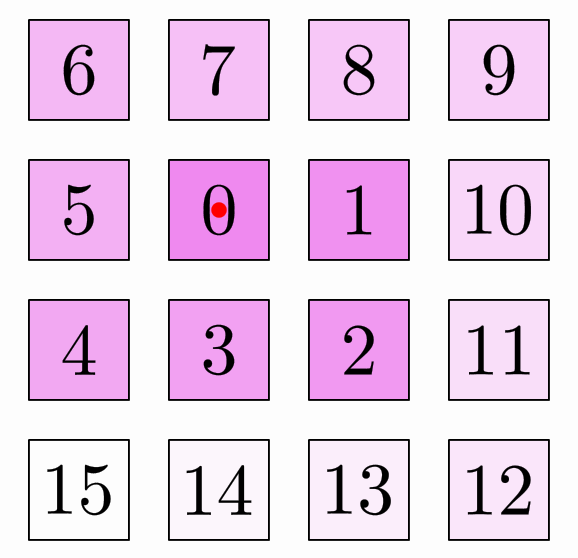
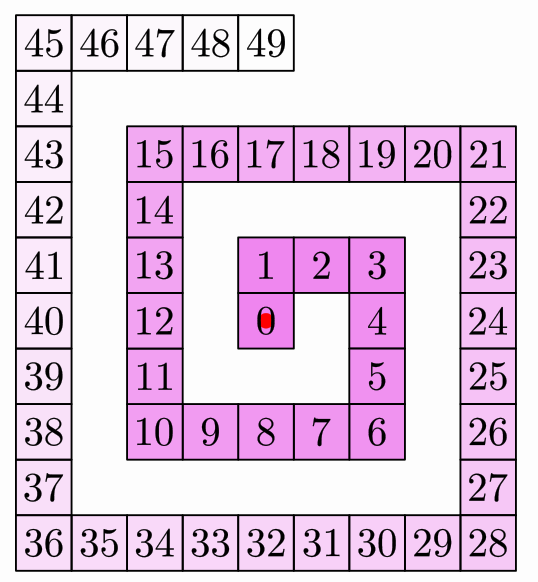
The SpiralLayout
Arranges objects in a spiral pattern radiating from a center point.
def numBoxes = 16
def group = MathObjectGroup.make()

(0..<numBoxes).each { n ->
    def square = Shape.square()
            .scale(0.25)
            .fillColor("violet")
            .fillAlpha(1 - (n + 1) / numBoxes)
            .thickness(6)

    def text = LatexMathObject.make("$n")
            .stack()
            .toObject(square)
            .layer(1)

    //Creates a group with square and text
    squareWithNumber = MathObjectGroup.make(square, text)

    //Add it as an element of the whole group
    group.add(squareWithNumber)
}

def refPoint = Point.origin()
        .thickness(40)
        .layer(1)
        .drawColor("red")

scene.add(refPoint)

// Create spiral layout
def layout = SpiralLayout.make(
        refPoint,
        SpiralOrientation.RIGHT_CLOCKWISE,
        0.1,  // Horizontal gap
        0.1   // Vertical gap
)

group.setLayout(layout)
scene.add(group)
camera.zoomToAllObjects()
Spiral Orientations
RIGHT_CLOCKWISE- Start right, spiral clockwiseRIGHT_COUNTERCLOCKWISE- Start right, spiral counter-clockwiseLEFT_CLOCKWISE- Start left, spiral clockwiseLEFT_COUNTERCLOCKWISE- Start left, spiral counter-clockwiseUP_CLOCKWISE- Start up, spiral clockwiseUP_COUNTERCLOCKWISE- Start up, spiral counter-clockwiseDOWN_CLOCKWISE- Start down, spiral clockwiseDOWN_COUNTERCLOCKWISE- Start down, spiral counter-clockwise
Controlling Spiral Aperture
// Create more spaced spiral
int numSquares = 50 //Add more boxes, to see it better

...<rest of the code>...

def layout = SpiralLayout.make(
    refPoint,
    SpiralOrientation.RIGHT_CLOCKWISE,
    0,      // No extra horizontal gap
    0       // No extra vertical gap
).setSpiralGap(1)  // Leave 1 space between spiral turns

group.setLayout(layout)
scene.add(group)
camera.zoomToAllObjects()
Spiral Gap Values:
- 0 (default) - Tight spiral, no space between turns
- 1 - One object-width space between turns
- 2 - Two object-widths space between turns
- etc.
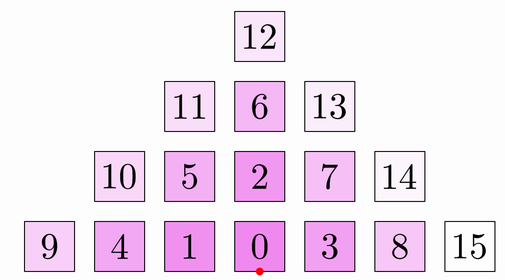
The HeapLayout
Creates a triangular pile arrangement, like stacking blocks.
def layout = HeapLayout.make(
    refPoint,
    0.1,  // Horizontal gap
    0.1   // Vertical gap
)

group.setLayout(layout)
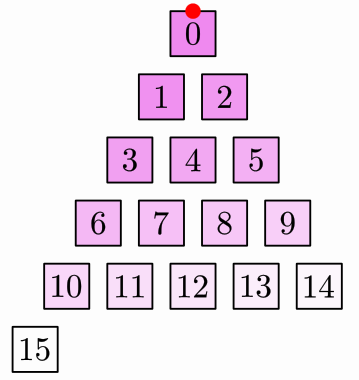
The PascalLayout
Arranges objects in the pattern of Pascal's triangle.
def layout = PascalLayout.make(
    refPoint,
    0.1,  // Horizontal gap
    0.1   // Vertical gap
)

group.setLayout(layout)
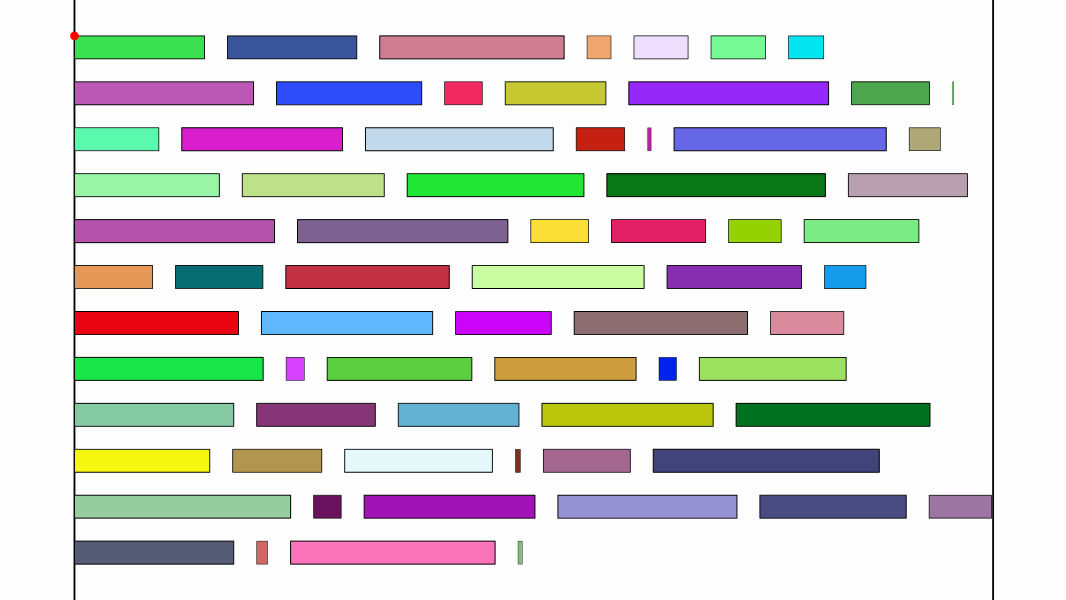
The FlowLayout
Similar to BoxLayout but creates new rows automatically when a maximum width is exceeded, like text wrapping.
int numBars = 70
def bars = MathObjectGroup.make()

def col1 = JMColor.parse('burlywood')
def col2 = JMColor.parse('white')

// Create bars with random widths
(0..<numBars).each { n->
    def bar = Shape.square()
            .scale(Math.random() + 0.25, 0.1)
            .fillColor(col1.interpolate(col2, n / numBars))

    def text = LatexMathObject.make("$n")
            .setHeight(bar.getHeight() * 0.8)
            .stack().toObject(bar)

    bars.add(MathObjectGroup.make(bar, text))
}

// Set maximum width
double maxWidth = 4
def corner = Point.relAt(0.1, 0.9)

// Visual width indicators
scene.add(corner.thickness(40).drawColor("red").layer(1))
scene.add(Line.YAxis().shift(corner.v.add(Vec.to(maxWidth, 0))))
scene.add(Line.YAxis().shift(corner.v))

// Create flow layout
def flowLayout = FlowLayout.make(
        corner,
        maxWidth,
        0.1,  // Horizontal gap
        0.1   // Vertical gap
).setBoxDirection(BoxDirection.RIGHT_DOWN)

bars.setLayout(flowLayout)
scene.add(bars)
camera.adjustToObjects(bars)
Composing Layouts
The ComposeLayout combines two layouts for complex hierarchical arrangements.
def composedLayout = ComposeLayout.make(
    outerLayout,  // Layout for positioning groups
    innerLayout,  // Layout within each group
    groupSize     // Number of elements per group
)
Composition Example
def group = MathObjectGroup.make()
int numSquares = 54

// Create 54 numbered squares
(0..<numBoxes).each { n ->
    def square = Shape.square()
        .scale(0.25)
        .fillColor("violet")
        .fillAlpha(1 - (n + 1) / numSquares)
        .thickness(6)

    def text = LatexMathObject.make("$n")
        .stack().toObject(square)
        .layer(1)

    group.add(MathObjectGroup.make(square, text))
}

def refPoint = Point.origin()
    .thickness(40)
    .drawColor("red")
    .layer(1)

scene.add(refPoint)

// Inner layout: 3×3 boxes
def innerLayout = BoxLayout.make(refPoint, 3, 0, 0)
    .setDirection(BoxDirection.RIGHT_DOWN)

// Outer layout: Pascal triangle of boxes
def outerLayout = PascalLayout.make(refPoint, 0.1, 0.1)

// Compose: groups of 9, arranged in Pascal triangle
def composedLayout = ComposeLayout.make(
    outerLayout,
    innerLayout,
    9  // 9 elements per group
)
group.setLayout(composedLayout)
scene.add(group)

camera.adjustToAllObjects()
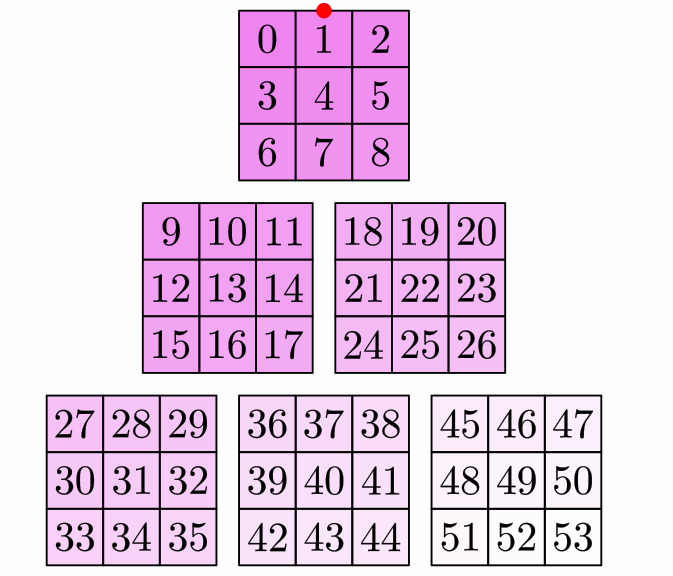
How it works:
1. Divides 54 elements into 6 groups of 9
2. Arranges each group of 9 using innerLayout (3×3 box)
3. Positions the 6 groups using outerLayout (Pascal triangle)
Best Practices
Positioning Strategy
- For simple positioning:
- Use
.shift()for relative movement - Use
.moveTo()for absolute placement -
Use
.center()for screen centering -
For relative positioning:
- Use
.stack()for precise control -
Use
.align()for simple edge alignment -
For multiple objects:
- Use
MathObjectGroupwith layouts - Consider composed layouts for complexity
Transform Selection
| Task | Method |
|---|---|
| Move object | .shift() or .moveTo() |
| Rotate | .rotate() |
| Scale | .scale() |
| Preserve shape | Isomorphic transforms |
| Mirror/flip | Reflection transforms |
| Complex mapping | General affine transform |
Performance Tips
- Layouts work best when all group elements have similar dimensions
- Cache transforms if applying the same transform multiple times
- Use method chaining to reduce code verbosity
- Group before animating for coordinated movements
Next Steps
Now that you understand transformations, explore: - Basic Shapes - Objects to transform - Styling - Visual appearance - Basic Flow - Animation techniques - Animations - Animated transformations