Animations
So far, we've learned to draw basic objects and position them where we want. Now let's explore what this library was designed for: animations. The Animation class stores any kind of animation you can apply to objects. Not only can MathObject instances be animated, but the Camera object can also be animated.
Quick Start: Your First Animation
Animating an object is straightforward. Here's a simple example:
def sq = Shape.square().center()  // A square centered on screen
play.shift(1, Vec.to(.5, .5), sq) // Move the square (.5, .5) units in 1 second
Important: Note that sq was not explicitly added to the scene. The shift animation adds it automatically.
Alternative Syntax
You can also define the animation explicitly as an Animation object:
def sq = Shape.square().center()          // A square centered on screen
def anim = Commands.shift(1, Vec.to(.5, .5), sq)
play.run(anim)
Tip: play.run(anim) is a convenient alias for scene.playAnimation(anim).
Understanding the Animation Lifecycle
An Animation object has four key methods that control its lifecycle. Understanding these is essential if you want to implement custom animations or control them manually:
-
initialize()- Prepares the objects to be animated. This should be called immediately before the animation begins. No modifications should be made to the objects between calling this method and starting the animation. -
processAnimation()- Computes the time based on the frame rate and calls thedoAnim()method. Returnstruewhen the animation is finished. -
doAnim(double t)- Actually performs the animation. The parametertranges from 0 to 1, where: t = 0represents the beginning of the animationt = 1represents the end
Note: t represents the percentage of animation completed, not actual time. Internally, a "smoothed" version of t is used to make animations start and end smoothly rather than linearly. This smooth function is a lambda that you can get or set using getLambda() and setLambda(). We'll explore custom lambdas in the next chapter.
finishAnimation()- Performs all necessary cleanup and finishing tasks.
Manual Animation Control
While you can use playAnimation() to handle everything automatically, you can also control animations manually:
// Manual control (equivalent to play.run(anim))
def anim = <define your animation here>
anim.initialize()
while (!anim.processAnimation()) {
    scene.advanceFrame()
}
anim.finishAnimation()
is equivalent to:
// Automatic control (recommended for most cases)
def anim = <define your animation here>
play.run(anim)
The play Object
The play object is a convenient shortcut for accessing commonly used animations. It's an instance of the PlayAnim class.
Animation Parameter Structure
In general, animation parameters follow this consistent structure:
(runTime, parameters, object_1, …, object_n)
The last part is a varargs MathObject, allowing you to apply the animation to multiple objects simultaneously.
Basic Animations
The basic transformations (shift, rotate, scale) have animated versions defined as static methods in the Commands class.
Example: Moving a Square
As they say, a GIF (and its code) is worth a thousand words:
def sq = Shape.square().fillColor("#87556f")
// Animates a moving square, with 3 seconds of duration
def shiftAnim = Commands.shift(3, Vec.to(.75, -.5), sq)
play.run(shiftAnim)
scene.waitSeconds(1)
We've performed a simple animation by defining it in the variable shiftAnim and playing it with the play.run() method.
Shorter Syntax
This animation and many others have shortcuts through the play object:
// Standard syntax
def sq = Shape.square().fillColor("#87556f")
play.shift(3, Vec.to(.75, -.5), sq)
scene.waitSeconds(1)
Or even simpler:
// Simplified syntax (without explicit Vec object)
def sq = Shape.square().fillColor("#87556f")
play.shift(3, .75, -.5, sq)
scene.waitSeconds(1)
Moving, Rotating, and Scaling
The play object provides fast access to the most common transformations. Here are examples of each:
// Rotate the square around its center, 45 degrees, in 3 seconds
play.rotate(3, 45*DEGREES, sq)

// Rotate the square around the origin, 120 degrees
play.rotate(5, Point.at(0, 0), 120*DEGREES, sq)

// Scale the square uniformly to 70%, around its center, in 3 seconds
play.scale(3, .7, sq)

// Scale the square to 70% in X and 150% in Y, around the origin, in 3 seconds
play.scale(3, Point.at(0, 0), .7, 1.5, sq)
Animating the Camera
The play object also provides animations for the camera view:
// Pan the camera for 4 seconds with vector (1, -1)
play.cameraShift(4, 1, -1)

// Zoom in the view to 200% (scale factor 0.5), in 3 seconds
play.cameraScale(3, .5)

// Zoom out the view to 25% (scale factor 4), in 3 seconds
play.cameraScale(3, 4)

// Pan and zoom to make specified objects visible, in 3 seconds
play.adjustToObjects(3, sq, circ, A, B)

// Pan and zoom to make all objects in the scene visible, in 3 seconds
play.adjustCameraToAllObjects(3)
Tip: Before adjusting the camera to objects, you can define the gaps (padding) between objects and the screen border using:
camera.setGaps(hGap, vGap)
Entering and Exiting Animations
These methods help you smoothly add or remove objects from the scene:
Fade Animations
// Fade in: object goes from alpha 0 to 1, adding it to the scene, in 2 seconds
play.fadeIn(2, sq)

// Fade out: object goes from alpha 1 to 0, removing it from the scene, in 2 seconds
play.fadeOut(2, sq)

// Fade out all objects in the scene, in 2 seconds
play.fadeOutAll(2)
Grow and Shrink Animations
// Grow in: scales the object from 0 to 1, adding it to the scene
play.growIn(2, sq)

// Grow in with rotation: same as above but also rotates 30 degrees
play.growIn(2, 30*DEGREES, sq)

// Shrink out: scales the object to 0 and removes it from the scene
play.shrinkOut(2, sq)

// Shrink out with rotation: same as above but also rotates 45 degrees
play.shrinkOut(2, 45*DEGREES, sq)
Move In/Out Animations
// Move in: object enters from outside the screen
// Direction specified using AnchorType: LEFT, RIGHT, LOWER, UPPER
play.moveIn(1, AnchorType.LEFT, sq)  // Entering from the left

// Move out: object exits the screen
play.moveOut(1, AnchorType.LEFT, sq)  // Exiting through the left
Using Default Timing
Most of these commands can be called without the runtime parameter, using default timing:
// This uses the default time (1 second) defined in play.defaultRunTimefadeIn
play.fadeIn(sq)
You can customize these defaults by modifying the public variables in the play object (e.g., play.defaultRunTimefadeIn).
Complete Example
Here's a demonstration combining multiple animations:
def sq = Shape.square().fillColor("#87556f").center()
def text = LatexMathObject.make(r"{\tt play.fadeIn(sq)}")
    .stack()
    .withGaps(.1)
    .toScreen(ScreenAnchor.LOWER)

scene.add(text)
play.fadeIn(sq)
scene.waitSeconds(1)

text.setLatex(r"{\tt play.scale(1,1.5,1,sq)}")  // Changes the text
play.scale(1, 1.5, 1, sq)
scene.waitSeconds(1)

text.setLatex(r"{\tt play.shrinkOut(1,45*DEGREES, sq)}")
play.shrinkOut(1, 45 * DEGREES, sq)
scene.waitSeconds(1)
Note: Using the play object provides quick access to simple animations, but for fine-tuning parameters like lambda functions or adding effects, you'll need to define animations "the long way" using Commands and explicit animation objects.
Highlighting Animations
Highlighting animations briefly attract the viewer's attention to specific objects:
Available Highlighting Types
Commands.highlight. Scales the object back and forth (default: 150%)**Commands.twistAndScale. Like highlight but adds a small twist (default: ±15 degrees)Commands.boxHighlight. Draws growing boxes around objects.ContourHighlight- Draws a "snake" running over the shape's contour
Example: All Highlight Types
def sq = Shape.square().center()

def importantPoint1 = sq.getPoint(1).drawColor("red")
def importantLabel1 = label(
      text: "A",
      path: importantPoint1
)

def importantPoint2 = sq.getPoint(2).drawColor("green")
def importantLabel2 =  label(
      text: "B",
      path: importantPoint2,
      rotatedirection: 45*DEGREES
)


def importantPoint3 = sq.getPoint(3).drawColor("blue")
def importantLabel3 =  label(
      text: "C",
      path: importantPoint3,
      rotatedirection: 135*DEGREES
)

scene.add(sq,
      importantPoint1, importantLabel1,
      importantPoint2, importantLabel2,
      importantPoint3, importantLabel3
)

play.highlight(importantLabel1)
play.twistAndScale(importantLabel2)
play.boxHighlight(importantLabel3)
play.contourHighlight(sq)

Configuring ContourHighlight
You can customize ContourHighlight animations:
def obj = Shape.circle()
scene.add(obj)
def anim = ContourHighlight.make(2, obj)

// Amplitude: max portion of shape to be drawn (0 to 1, default 0.4)
// A value of 1 draws and then undraws the entire shape
anim.setAmplitude(.85)

// Thickness of the "snake"
anim.setThickness(15)

// Color of the "snake"
anim.setColor("violet")

play.run(anim)
scene.waitSeconds(2)
Highlighting Bounding Boxes
For complex shapes, highlighting the bounding box can be clearer:
def obj = LatexMathObject.make("Look here!")
    .center().scale(2)
scene.add(obj)

// This animation is complex because the shape has many details
def animComplex = ContourHighlight.make(2, obj)
play.run(animComplex)

// Using a bounding box is simpler
// The .1 parameter is the gap to add around the box
def animSimpler = ContourHighlight.makeBBox(2, .1, obj)
// Alternative syntax:
// def animSimpler = ContourHighlight.make(2, .1, obj.getBoundingBox())
animSimpler.setColor("green")
play.run(animSimpler)
scene.waitSeconds(2)
Highlighting Points
You can also highlight Point objects. A circle with radius equal to the point's thickness will be drawn:
def P1 = Point.at(-.5, 0)
    .dotStyle(DotStyle.CROSS)
    .thickness(30)
    .drawColor("blue")

def P2 = Point.at(0, 0)
    .dotStyle(DotStyle.TRIANGLE_UP_FILLED)
    .thickness(50)
    .drawColor("tomato")

def P3 = Point.at(.5, 0)
    .dotStyle(DotStyle.CIRCLE)
    .thickness(30)
    .drawColor("black")

scene.add(P1, P2, P3)

def anim1 = ContourHighlight.make(2, P1).setColor("gold")
def anim2 = ContourHighlight.make(2, P2).setColor("blue")
def anim3 = ContourHighlight.make(2, P3).setColor("green")
play.run(anim1, anim2, anim3)
scene.waitSeconds(1)
Aligning Objects
The Commands.align animation works similarly to the MathObject.align() method but animates the process:
def upper = LatexMathObject.make("upper")
def lower = LatexMathObject.make("lower")
def left = LatexMathObject.make("left")
def right = LatexMathObject.make("right")
def hcenter = LatexMathObject.make("center")
def vcenter = LatexMathObject.make("vcenter")
def center = Shape.square().scale(3).fillColor("lightblue")

scene.add(center)
camera.adjustToAllObjects()

def anim1 = Commands.align(3, center, AlignType.LEFT, left)
def anim2 = Commands.align(3, center, AlignType.RIGHT, right)
def anim3 = Commands.align(3, center, AlignType.UPPER, upper)
def anim4 = Commands.align(3, center, AlignType.LOWER, lower)
def anim5 = Commands.align(3, center, AlignType.HCENTER, hcenter)
def anim6 = Commands.align(3, center, AlignType.VCENTER, vcenter)

play.run(anim1, anim2, anim3, anim4, anim5, anim6)
scene.waitSeconds(1)
Moving Along a Path
The MoveAlongPath animation moves an object along a specified path. You can use either a Shape or JMPath object to define the path.
Path Movement Parameters
The animation accepts two important boolean parameters:
- Rotation: Whether the object should rotate to match the tangent of the path
- Parameterization:
true- Uses arc-length parameterization for constant velocity along the pathfalse- Uses standard Bézier parameterization (slower at sharp turns)
Example: Comparing Parameterizations
// Create a path shaped like a piece of tangerine
def pathShape = Shape.circle().fillColor("orange")  // A circle (4 Bézier curves)
pathShape.get(2).shift(1, 0)  // Move left point to create a wedge shape
scene.add(pathShape)

// Blue square: moves with Bézier coordinates
def blueSquare = Shape.square()
    .scale(.1)
    .fillColor("darkblue").fillAlpha(.4)

// Red square: uses arc-length for constant velocity
def redSquare = blueSquare.copy()
    .fillColor("darkred").fillAlpha(.4)

// Animation with constant velocity (arc-length parameterization)
def anim = MoveAlongPath.make(
    5,                      // Duration in seconds
    pathShape,              // Path to follow
    blueSquare,             // Object to move
    AnchorType.CENTER,      // Center of object matches the path
    RotationType.ROTATE,    // Rotate object to match tangent
    true                    // Use arc-length (constant velocity)
).setLambda(t -> t)         // Linear timing function

// Animation with Bézier parameterization
def anim2 = MoveAlongPath.make(
    5,                      // Duration in seconds
    pathShape,              // Path to follow
    redSquare,              // Object to move
    AnchorType.LEFT,        // Left side of object matches the path
    RotationType.FIXED,     // Don't rotate object
    false                   // Use Bézier parameterization
).setLambda(t -> t)         // Linear timing function

play.run(anim, anim2)
Note: We specified .setLambda(t -> t) for uniform velocity. Lambda functions are covered in detail in the next chapter.
Tip: Although FunctionGraph is a subclass of Shape and supports MoveAlongPath, it's recommended to use the PointOnFunctionGraph object when animating a point along a function graph.
Tip: Try adding the method camera.registerUpdater(FollowObject.make(blueSquare)) just before the play.run
command to keep the camera always centered on the blue square.
The ShowCreation Animation
The ShowCreation animation draws an object and adds it to the scene. Different strategies are used depending on the object type, specified in the ShowCreationStrategy enum. The strategy is chosen automatically but can be overridden with setStrategy().
Warning: Forcing a specific strategy may cause errors for incompatible object types.
Example: Creating a Square
def sq = Shape.square()
    .fillColor("#87556f").center()

play.showCreation(2, sq)  // Creates sq in 2 seconds

// Alternative syntax:
// def sc = ShowCreation.make(2, sq)
// play.run(sc)

scene.waitSeconds(1)

For a simple shape like this, the SIMPLE_SHAPE_CREATION strategy is used.
Example: Creating a Math Formula
When creating a MultiShapeObject (like a LaTeX formula), a small delay is added between each shape:
def text = LatexMathObject.make(r"$a^2+b^2=c^2$")
    .center().scale(3)

play.showCreation(2, text)
scene.waitSeconds(1)

Tip: Try using a longer duration (10 seconds) to see the animation details: the contour is drawn first, then the glyphs are filled.
Creation Strategies
Specific creation strategies exist for different object types: - Axes - Arrows - Delimiters - Simple shapes - Multi-shape objects
The Transform Animation
The Transform class smoothly transforms one Shape object into another.
Basic Transform Example
def circle = Shape.circle()
    .shift(-1, 0).scale(.5)

def pentagon = Shape.regularPolygon(5)
    .shift(.5, -.5).style("solidblue")

play.transform(3, circle, pentagon)
scene.waitSeconds(3)
Note: The transform animation also interpolates drawing parameters like thickness and color.
Important: When transformation from A to B is complete, A is removed from the scene and B is added. Use object B for any subsequent operations.
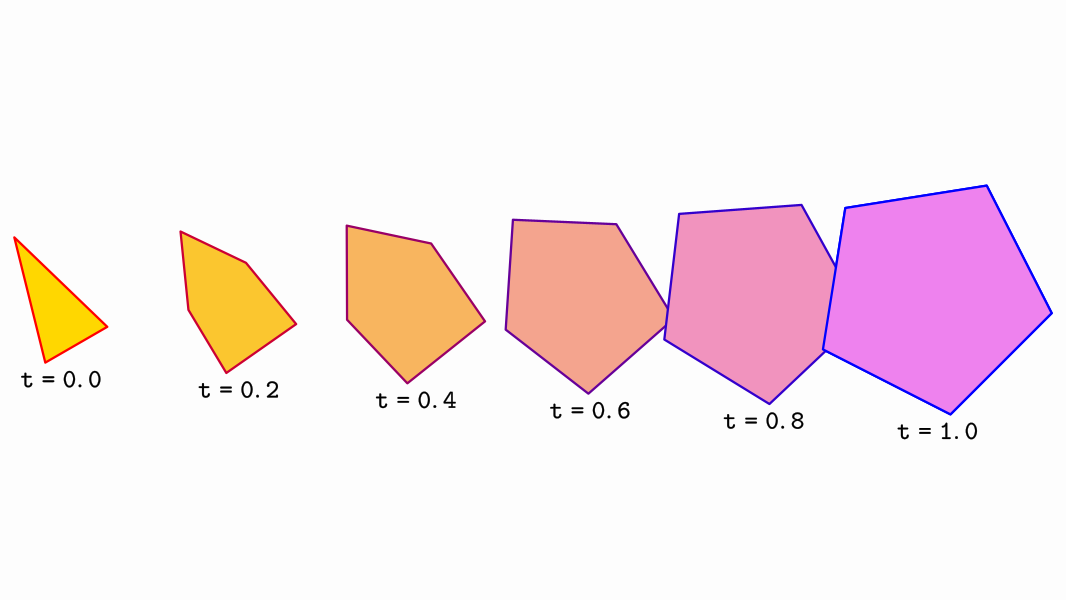
Understanding Transform Steps
This example shows intermediate transformation states:
def triangle = Shape.regularPolygon(3)
    .scale(.5, 1)
    .rotate(PI / 6)
    .drawColor("red")
    .fillColor("gold")
    .thickness(20)

def pentagon = Shape.regularPolygon(5)
    .rotate(PI / 4)
    .drawColor("blue")
    .fillColor("violet")
    .thickness(20)

// Position pentagon 5 units to the right of triangle
pentagon
    .stack()
    .withDestinyAnchor(AnchorType.RIGHT)
    .withGaps(5)
    .toObject(triangle)

// Ensure everything is visible
camera.adjustToObjects(triangle, pentagon)

// Create the transformation animation
def anim = Transform.make(2, triangle, pentagon)
anim.setLambda(t -> t)  // Constant velocity
anim.initialize()

// Show intermediate steps
int num = 6  // Number of steps to display
for (int i = 0; i < num; i++) {
    double t = 1d * i / (num - 1)

    // Compute the animation at time t
    anim.doAnim(t)

    // Get the intermediate object
    def intermediate = anim.getIntermediateObject().copy()

    // Add descriptive text below the intermediate object
    def lat = LatexMathObject.make(r"{\tt t=" + t + "}")
        .stack()
        .withDestinyAnchor(AnchorType.LOWER)
        .withRelativeGaps(0, .5)
        .toObject(intermediate)

    // Add both elements to the scene
    scene.add(intermediate, lat)
}

// Save the result
scene.saveImage("intermediateSteps.png")
Transform Strategies
The transformation method depends on the source and destination object types. For example, when both shapes are regular polygons with the same number of sides, an isomorphic transform is used:
def pentagon = Shape.regularPolygon(5)
    .scale(.5)
    .shift(-1, -1)
    .style("solidOrange")

def pentagonDst = Shape.regularPolygon(5)
    .scale(.8)
    .shift(.5, -.5)
    .rotate(45*DEGREES)
    .style("solidBlue")

def tr = Transform.make(3, pentagon, pentagonDst)
play.run(tr)
scene.waitSeconds(1)
The isomorphic method ensures the object doesn't get distorted during transformation.
Available Transform Strategies
You can force a specific strategy using .setTransformMethod(method):
Warning: Forcing an incompatible strategy may cause errors or prevent animation.
Currently implemented strategies:
-
INTERPOLATE_SIMPLE_SHAPES_BY_POINT- Point-by-point interpolation for simple shapes (single connected component like squares or circles). Allows path optimization for smoother animation. -
INTERPOLATE_POINT_BY_POINT- General interpolation converting shapes to canonical form. Works with multiple components (e.g., letter "B" has 3 components). -
ISOMORPHIC_TRANSFORM- Creates direct isomorphism between shapes. The first two points of the source transform to the first two points of the destination. -
ROTATE_AND_SCALEXY_TRANSFORM- Similar to isomorphism but with non-uniform scaling. Used for rectangle-to-rectangle transforms to prevent distortion. -
FUNCTION_INTERPOLATION- Interpolates between function graphs, x-to-x. -
MULTISHAPE_TRANSFORM- For transforming MultiShape objects (like LaTeXMathObject). -
GENERAL_AFFINE_TRANSFORM- Like isomorphic transform but accepts general affine transformations. First three points of source map to first three points of destination. -
ARROW_TRANSFORM- Specialized for transforming arrows, using isomorphic transform while properly handling arrow heads.
Comparing Strategies
This example shows why the correct strategy matters:
def sq = Shape.square()
    .center().style("solidRed")

def sq2 = Shape.square()
    .scale(.25, 1).style("solidGreen")
    .rotate(45 * DEGREES)
    .moveTo(Point.at(1, 0))

// Forcing GENERAL_AFFINE_TRANSFORM (not ideal for rectangles)
def tr = Transform.make(10, sq, sq2)  // 10 seconds to see details
tr.setTransformMethod(Transform.TransformMethod.GENERAL_AFFINE_TRANSFORM)
play.run(tr)
scene.waitSeconds(3)
Notice the intermediate steps aren't natural rectangles. This is why ROTATE_AND_SCALEXY_TRANSFORM exists.
Best Practice: Let JMathAnim choose the strategy automatically by removing the setTransformMethod() call:
Flip Transforms
A simpler transformation animation that works with any MathObject is FlipTransform. This scales the first object to 0 (horizontally, vertically, or both) then scales the second object from 0 to 1, creating a flipping effect.
Flip Orientations
HORIZONTAL- Flip left-to-rightVERTICAL- Flip top-to-bottomBOTH- Flip both directions
Example: Flipping Text
def text = LatexMathObject.make("JMathAnim")
def flips = [
    OrientationType.HORIZONTAL,
    OrientationType.VERTICAL,
    OrientationType.BOTH
]

// Center all glyphs on screen
// Note: MultiShapeObject and subclasses are iterable
for (s : text) {
    s.center()
}

camera.zoomToObjects(text)

def previous = null
int index = 0

for (s : text) {
    if (previous != null) {
        def flipTransform = FlipTransform.make(2, flips[index], previous, s)
        play.run(flipTransform)
        index = (index + 1) % 3
    }
    previous = s
}
Animating Style Changes
Beyond position and shape, you can animate visual properties (style) of objects.
The setColor Animation
Animates color changes. You can specify draw color, fill color, or both. Set to null to leave a color unchanged.
Example: Color Transitions
def circle = Shape.circle().thickness(8)
play.showCreation(circle)
scene.waitSeconds(1)

// Animate fill color to violet (draw color unchanged)
play.run(
    Commands.setColor(2, null, JMColor.parse("VIOLET"), circle)
)

scene.waitSeconds(1)

// Animate to the "solidorange" style
play.run(
    Commands.setStyle(2, "solidorange", circle)
)

// Animate to a gradient fill and fixed draw color
def gradient = JMRadialGradient.make(Vec.to(.25, .75), .5)
gradient.setRelativeToShape(true)
    .add(0, "white")
    .add(1, "brown")

play.run(
    Commands.setColor(2, JMColor.parse("STEELBLUE"), gradient, circle)
)
scene.waitSeconds(3)
Simplified Syntax
These methods have convenient shortcuts in the play object:
// These are equivalent to Commands.setColor and Commands.setStyle
play.setColor(2, JMColor.parse("STEELBLUE"), gradient, circle)
play.setStyle(2, "solidorange", circle)
The setStyle Animation
Changes all drawing parameters to match a saved style.
Note: Currently, only draw/fill colors/gradients and thickness are interpolated. At animation end, all destination attributes (layer, dash style, etc.) are copied.
The setMP Animation
A more general approach that directly interpolates drawing properties:
// Animate object A's properties to match object B's properties over 3 seconds
play.run(Commands.setMP(3, B.getMp(), A))
AffineTransform Related Animations
These animations provide animated versions of the affine transformations discussed in the transforming objects chapter.
Affine Transform
Animates a general affine transformation:
// Create axes for reference
def axes = Axes.make()
axes.generatePrimaryXTicks(-2, 2, 1)
axes.generatePrimaryYTicks(-2, 2, 1)
axes.thickness(6).drawColor("darkblue").layer(1)
scene.add(axes)

// Create a grid (not using CartesianGrid since its elements can't be transformed)
def grid = MathObjectGroup.make()
for (int i = -5; i < 5; i++) {
    grid.add(Line.XAxis().shift(0, .5 * i).thickness(i % 2 == 0 ? 4 : 2))
    grid.add(Line.YAxis().shift(.5 * i, 0).thickness(i % 2 == 0 ? 4 : 2))
}

// Create a "B" glyph
def bigB = LatexMathObject.make("B")
    .center().setHeight(1)
    .style("solidorange").fillAlpha(.5)

// Animate creation
play.showCreation(grid, bigB)
scene.waitSeconds(1)

// Define transformation points
def A = Point.at(0, 0).drawColor("blue")
def B = Point.at(1, 0).drawColor("blue")
def C = Point.at(0, 1).drawColor("blue")
def D = Point.at(0, .5).drawColor("red")
def E = Point.at(1, 0).drawColor("red")
def F = Point.at(1, 1).drawColor("red")

scene.add(A, B, C, D, E, F)

// Animate the affine transform (A,B,C) → (D,E,F)
def anim = Commands.affineTransform(3, A, B, C, D, E, F, grid, bigB)
play.run(anim)
scene.waitSeconds(1)

This animation interpolates element-by-element from the identity matrix to the transformation matrix. For special cases (reflection, isomorphism), JMathAnim uses optimized algorithms for better visual results.
Reflection
Animates a reflection that maps point A to point B:
def grid = MathObjectGroup.make()
// Create a grid
for (int i = -15; i < 15; i++) {
    grid.add(Line.XAxis().shift(0, .5 * i).thickness(i % 2 == 0 ? 4 : 2))
    grid.add(Line.YAxis().shift(.5 * i, 0).thickness(i % 2 == 0 ? 4 : 2))
}

// A pentagon
def reg = Shape.regularPolygon(5)
    .center()
    .fillColor("steelblue")

// Text label
def text = LatexMathObject.make("Pentagon")
    .center().setHeight(.5)
    .style("solidorange").fillAlpha(.5)
    .layer(1)

// Origin and destination points for reflection
def A = reg.getPoint(0).drawColor("blue").copy()  // Copy of first vertex
def B = Point.at(1, .5).drawColor("red")

// Add everything to the scene
scene.add(A, B, grid, text)

// Define and play the reflection animation
def anim = Commands.reflection(3, A, B, reg, text, grid)
play.run(anim)
scene.waitSeconds(2)
Note: Point A is also transformed since it's part of the shape.
Reflection by Axis
Animates a reflection with a specified axis:
def reg1 = Shape.regularPolygon(6)
    .style("solidred").center()

def reg2 = reg1.copy()
    .style("solidorange")

scene.add(reg1, reg2)
camera.scale(2)

// Use an edge of the hexagon as the reflection axis
def A = reg1.getPoint(1)
def B = reg1.getPoint(2)
scene.add(Line.make(A, B).dashStyle(DashStyle.DOTTED))

def anim = Commands.reflectionByAxis(3, A, B, reg2)
play.run(anim)
scene.waitSeconds(2)
Isomorphism
Direct Isomorphism
Animates the direct isomorphism mapping (A,B) → (C,D):
def A = Point.origin().drawColor("blue")
def B = Point.at(1, 0).drawColor("blue")
def C = Point.at(1, .2).drawColor("red")
def D = Point.at(1.8, .6).drawColor("red")

def triangle = Shape.polygon(A.copy(), B.copy(), Point.at(0, .5))
triangle.style("solidblue")

scene.add(triangle, A, B, C, D)

def anim = Commands.isomorphism(3, A, B, C, D, triangle)
play.run(anim)
scene.waitSeconds(3)
How it works: JMathAnim creates the isomorphism as a composition of shifting, rotating, and uniform scaling, preserving the shape's form (only size changes).
Inverse Isomorphism
Available since version 0.9.9, this includes a reflection:
// Same setup as above, but use inverseIsomorphism
def anim = Commands.inverseIsomorphism(3, A, B, C, D, triangle)
TwistTransform
Previous animations aimed for natural-looking intermediate steps when transforming object A into object B. However, when measurements must be preserved (like rectifying a circle arc), point-to-point interpolation won't work. That's why TwistTransform was created.
Purpose and Limitations
Available since version 0.9.12, TwistTransform creates "realistic transforms" that preserve measurements. It has specific requirements:
Requirements:
- Both A and B must be shapes with straight segments
- Both must have the same number of vertices
- Vertices must be properly "aligned" (vertex 0 of A goes to vertex 0 of B, etc.)
- Shapes should be open paths (closed shapes work, but intermediate steps may not appear closed)
Simple Example: Square to Segment
def sq = Shape.square().drawColor("steelblue")

// Create a segment with 5 points (square has 5 points when opened)
// Same length as square sides
def seg = Shape.segment(Vec.at(0, 0), Vec.at(4, 0), 5)
    .drawColor("firebrick")

camera.adjustToObjects(sq, seg)

// Twist transform: 5 seconds, from sq to seg, using point 0 as pivot
def tr = TwistTransform.make(5, sq, seg, 0)
play.run(tr)
The square unfolds into a segment while preserving side lengths.
Understanding the Pivot Point
The pivot point parameter is crucial and produces different effects. The animation consists of:
- Shift - Moves the pivot point of source to the pivot point of destination
- Angle adjustment - Progressively modifies angles of segments from pivot point to match destination angles. Segments are lengthened/shortened as needed.
- Pre-pivot segments - Same process applied to segments before the pivot point
You can omit the pivot parameter; JMathAnim will use an approximation of the midpoint (size()/2).
Advanced: All three processes can be controlled with custom lambda functions.
Advanced Example: Rectifying a Semicircle
// Semicircle with 50 points (polygonal approximation, not Bézier curves)
def semiCirc = Shape.arc(PI, 50).drawColor("steelblue")
PathUtils.rectifyPath(semiCirc.getPath())  // Remove all curvature

// Create segment from (0,0) to (-PI,0)
// Note: (-PI,0) not (PI,0) so first point of segment matches arc's first point
// Using (PI,0) would make the arc "turn around" to match endpoints
def seg = Shape.segment(Vec.to(0, 0), Vec.to(-PI, 0), 50)
    .drawColor("firebrick")

// Position segment below arc
seg.stack()
    .withDestinyAnchor(AnchorType.LOWER)
    .withGaps(.25)
    .toObject(semiCirc)

camera.centerAtObjects(semiCirc, seg)

def tr = TwistTransform.make(5, semiCirc, seg)
play.run(tr)
scene.waitSeconds(2)
This demonstrates the classic geometric problem of arc rectification, showing how a curved arc can be "unrolled" into a straight segment while preserving its length.
Transforming Math Expressions
LaTeX math expressions support a specialized animation called TransformMathExpression that allows fine-tuning transformations between LatexMathObject instances. This is covered in detail in the mathematical formulas chapter.