Mathematical formulas
As we have seen, math formulas are created with the LaTexMathObject class. Since version 0.9.5-SNAPSHOT, the LaTeX code is compiled using the library JLaTeXMath, removing the need to have a working LaTeX distribution installed in the system. All glyphs generated are converted into Shape objects.
For example, if we generate a math expression with the command
def sum=LatexMathObject.make(r"$2+2=4$")
it will generate 5 shapes that we can access via the get method. Thus, the command sum.get(0) will return the first shape (the "2" glyph), sum.get(1) will return the "+" glyph, etc. These indices will be important to specify exactly how we want the animation from one expression to another to be done.
The major drawback of this approach is that it is not always clear which glyph of the formula corresponds to a given index. For that, we have the method formulaHelper that takes a varargs of LatexMathObject objects, or String with the LaTeX code, overlays the shape number for each one, stacks the formulas vertically, zooms and adds them to the scene. For example:
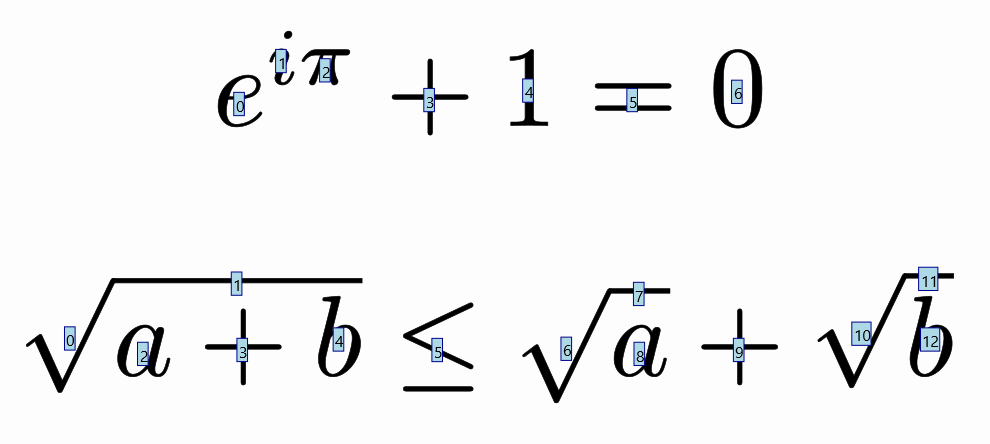
def t1 = LatexMathObject.make(r"$e^{i\pi}+1=0$")
def t2 = LatexMathObject.make(r"$\sqrt{a+b}\leq\sqrt{a}+\sqrt{b}$")
scene.formulaHelper(t1, t2)
We'll obtain the following image. You can make a screenshot or save it to a file with the saveImage command to examine it more deeply:
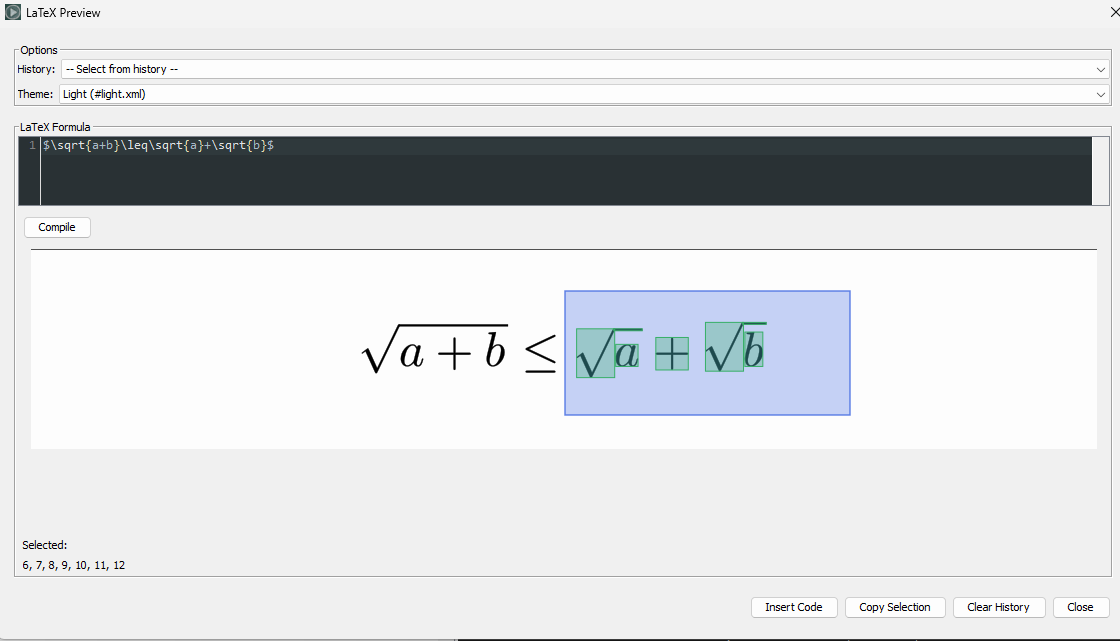
Alternatively, you can use the LaTeX preview (Tools->LaTeX preview) and select individual glyphs to see the indices selected. You can copy them to the clipboard with the Copy Selection button:
It is recommended, before doing any animation that involves math formulas, to run this method to get useful references when defining animations.
Setting color to specific parts of a math expression
If you want to apply colors to some parts of a math expression, you can use the \color commands of LaTeX, or you can use the setColorToIndices method and specify the indexes to apply the color. For example:
def formula=LatexMathObject.make(r"$(a+b)^2=a^2+b^2+2ab$").center();
camera.adjustToAllObjects()

//You can pass a JMColor or a String with the color definition to the method
formula.setColorToIndices("darkred",1,7,14);//Color dark red to indexes 1, 7 and 14
formula.setColorToIndices(JMColor.parse("darkgreen"),3,10,15);//Color dark green to indexes 3, 10 and 15
scene.add(formula)

Note that the method changes both draw and fill colors. Since version 0.9.11, there is another, easier way to automatically assign colors, which we will see later in this chapter.
The slice method
Sometimes you may need to separate a formula into parts so you can animate them separately. The slice method extracts a subformula with the given indexes and removes the extracted shapes from the original formula. For example, suppose we have the formula $A=b\cdot h$ and want to initially show the "b" and "h" glyphs in a rectangle before putting them in their original place:
 def rectangle = Shape.square().center()
.scale(2, 1)
.fillColor("chocolate")
def formula = LatexMathObject.make(r"$A=b\cdot h$")
    .layer(1)
    .stack()
    .withGaps(.1)
    .toScreen(ScreenAnchor.UPPER)

formula.setColorToIndices("steelblue", 2)
formula.setColorToIndices("crimson", 4)

def sliceBase = formula.slice(2)//Extracts the "b" from the formula
def sliceHeight = formula.slice(4)//Extracts the "h from the formula

def sliceBaseCenter = sliceBase.getCenter()//Save the centers into these variables
def sliceHeightCenter = sliceHeight.getCenter()

//Position the sliced parts in the rectangle
sliceBase
    .stack()
    .withDestinyAnchor(AnchorType.LOWER)
    .withGaps(.1)
    .toObject(rectangle)

sliceHeight
    .stack()
    .withDestinyAnchor(AnchorType.RIGHT)
    .withGaps(.1)
    .toObject(rectangle)

play.showCreation(rectangle, sliceBase, sliceHeight)
play.showCreation(formula)//Draws the formula, except "b" and "h"
scene.waitSeconds(1)
def anim1 = Commands.moveTo(3, sliceBaseCenter, sliceBase)
def anim2 = Commands.moveTo(3, sliceHeightCenter, sliceHeight)
play.run(anim1, anim2)//Restores the slices to their original positions
scene.waitSeconds(2)
Note that, although the sliced formula has only one element, the indexes remain the same. So, if the "b" glyph was in position 2 in the original formula, it is still in position 2 in the sliced formula. Consequently, the method sliceBase.get(2) returns the "b" shape. The other indexes store empty shapes.
There is another version of the method, with a boolean flag that controls whether the sliced shapes are removed from the original math expression or not. In the preceding example, LatexMathObject sliceBase=formula.slice(false,2) will generate a slice of the "b" glyph without changing the original formula.
The slice method can be a powerful tool if you want to operate on parts of complex math expressions. If you want to progressively show a complex formula, the easiest option is to slice it into the different parts you will be showing at a concrete point in the animation. For example, suppose we want to progressively show the first terms of the Taylor expansion of sin(x). We have the following LaTeX code:
def taylorLatexCode=LatexMathObject.make(r'$$
\sin x = x - \frac{x^3}{3!} + \frac{x^5}{5!}
            - \frac{x^7}{7!} + \frac{x^9}{9!}
            - \frac{x^{11}}{11!}
            \cos(\xi), \qquad \xi \in (0, x)
$$')
The method formulaHelper(taylorLatexCode) shows on screen the indexes of the formula. You can save it to a file with the saveImage method or just have the program wait with waitSeconds long enough to make a screenshot and obtain the following:

Or you can use the LaTeX preview dialog of the editor where you can select areas or individual glyphs to get the indices:
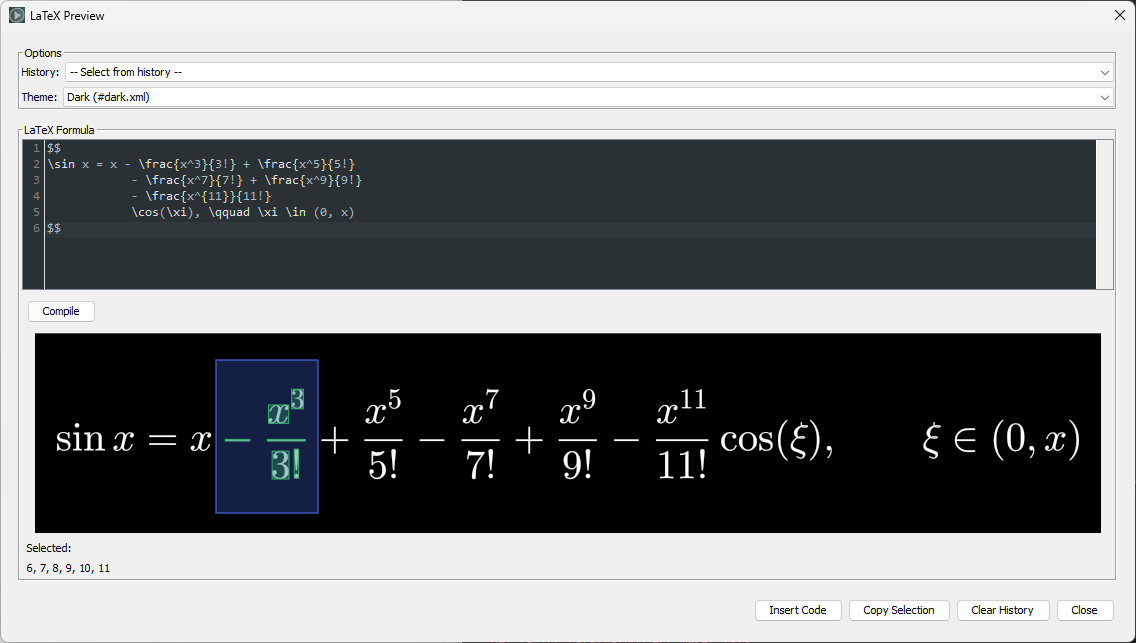
As you can see, the formula has 52 elements. We are interested in the start and end indexes of the terms, and using the slice method we will separate the formula into parts:
def taylor=LatexMathObject.make(r'''$$
\sin x = x - \frac{x^3}{3!} + \frac{x^5}{5!}
            - \frac{x^7}{7!} + \frac{x^9}{9!}
            - \frac{x^{11}}{11!}
            \cos(\xi), \qquad \xi \in (0, x)
$$''')
camera.adjustToObjects(taylor)

def pieces=new LatexMathObject[8]
pieces[0]=taylor.slice(*0..4)//sin x =
pieces[1]=taylor.slice(5)// x
pieces[2]=taylor.slice(*6..11) //-x^3/3!
pieces[3]=taylor.slice(*12..17)//etc.
pieces[4]=taylor.slice(*18..23)
pieces[5]=taylor.slice(*24..29)
pieces[6]=taylor.slice(*30..44)
pieces[7]=taylor.slice(*45..51)//<--*45..51 is the same as 45, 46, 47, 48, 49, 50, 51 (Groovy magic)

for (i:0..7) {
    //Now we can work on each term individually
    play.showCreation(1,pieces[i])
    scene.waitSeconds(1)
}

Animating transforms between equations
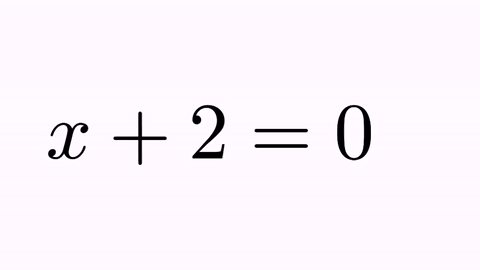
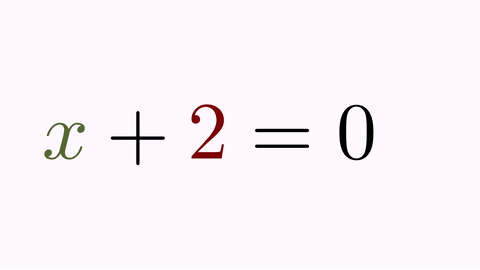
Suppose we are planning to perform an animation that solves a simple equation x+2=0. We define the two math expressions:
def t1=LatexMathObject.make(r"$x+2=0$")
def t2=LatexMathObject.make(r"$$x=-2$$")
and we want to define a precise, self-explanatory animation that transforms the first equation into the second.
If we simply try the command
play.transform(4, t1, t2)
we will obtain the following animation:
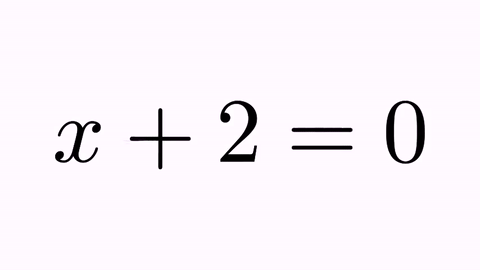
It's nice, but not illustrative. It would be better to force the "+2" to convert into "-2", and the original "x" and "=" glyphs to their counterparts. For this, we have the TransformMathExpression animation class. But first, we must be clear about the indexes of the different shapes that compose the latex objects. For that, we use the method formulaHelper (or the LaTeX preview dialog of the editor):
formulaHelper(t1,t2)
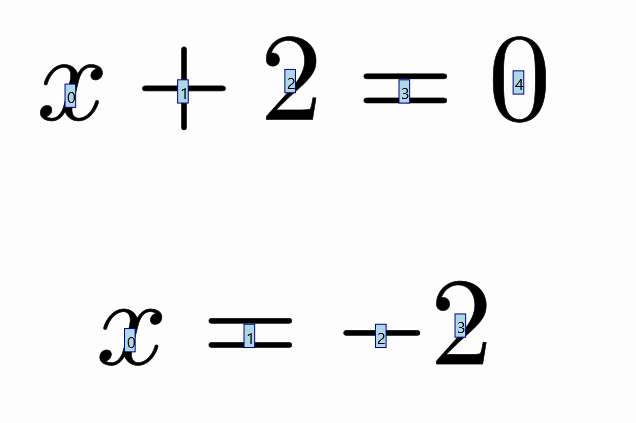
As you can see, the indices of t1 are [0]=x, [1]=+, [2]=2, [3]=0, [4]=0 (note there are two glyphs for the "0"). For t2 the indices are [0]=x, [1]=-, [2]=-, [3]=2. Note that for the "-2" expression, two minus glyphs are used by LaTeX, one for the equal sign and another for the negative sign. Now we can design the animation:
def tr = TransformMathExpression.make(4, t1, t2)
tr.map(0, 0)//Transforms orig-shape 0 to dst-shape 0
tr.map(3, 1)//Transforms orig-shape 3 to dst-shape 1
tr.map(1, 2)//Transforms orig-shape 1 to dst-shape 2
tr.map(2, 3)//Transforms orig-shape 2 to dst-shape 3
//Note that we are not mapping indexes 4 and 5 from t1, so these glyphs will be removed
play.run(tr)
scene.waitSeconds(3)
Note that we are not mapping index 4 from t1 to any index from t2. So, this glyph will be removed with a fade out (the default behaviour).
Now the animation is more illustrative. We can improve it further by aligning the formulas at a given glyph. For example, let's align them by their equal signs:
def t1 = LatexMathObject.make(r"$x+2=0$")
def t2 = LatexMathObject.make(r"$x=-2$")
//Move t2 so that glyph 1 (the minus after the equal) will be in the same position
//as glyph 3 of t1 (the "=" sign)
t2.alignCenter(1, t1, 3)
camera.zoomToObjects(t1, t2)
def tr = TransformMathExpression.make(4, t1, t2)
tr.map(0, 0)
tr.map(3, 1)
tr.map(1, 2)
tr.map(2, 3)
play.run(tr)
scene.waitSeconds(3)
Mapping multiple glyphs to one or vice versa
So far, we have only mapped individual glyphs. But it's also possible to map one source glyph to multiple destination glyphs or multiple source glyphs to a single destination glyph. This is done with the mapGroup method. Let's see an example:
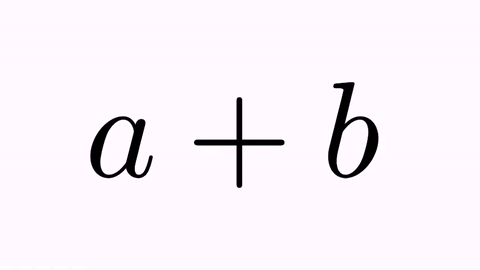
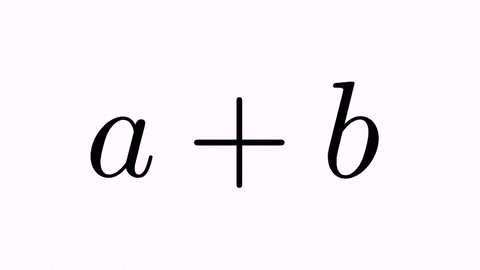
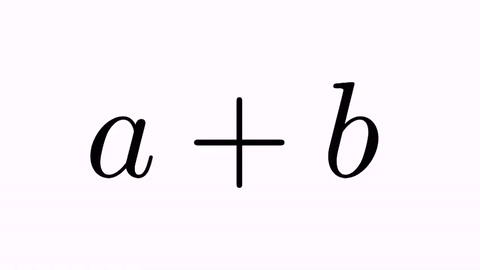
def t1 = LatexMathObject.make(r"$x$")
def t2 = LatexMathObject.make(r"$x+x+x+x+x$")
t1.center()
camera.adjustToAllObjects()
def tr = TransformMathExpression.make(3, t1, t2)
tr.mapGroup(0, 0, 2, 4, 6, 8)//Maps glyph 0 from t1 to glyphs 0,2,4,6,8 of t2
play.run(tr)
scene.waitSeconds(2)

In this animation, the source glyph first moves to the average of the destination glyphs, and then "separates" into each one of them.
Here is another example with a many-to-one mapping:
def t1 = LatexMathObject.make(r"$2+2+2+2$")
def t2 = LatexMathObject.make(r"$8$")
t1.center()
t2.moveTo(t1.getCenter())
camera.adjustToAllObjects()
def tr = TransformMathExpression.make(3, t1, t2)
tr.mapGroup(0, 0, 2, 4, 6)//Maps glyphs 0,2,4,6 of t1 to glyph 0 of t2
play.run(tr)
scene.waitSeconds(2)
In this case, all source glyphs first move to their average center, and then they "join" into the destination glyph.
Transformation styles
For each individual map, you can set its transformation style. There are currently four styles, defined in the enum MathTransformStyle: INTERPOLATE (the default), FLIP_HORIZONTALLY, FLIP_VERTICALLY and FLIP_BOTH.
def t1 = LatexMathObject.make(r"$ABCD$")
def t2 = LatexMathObject.make(r"$WXYZ$")
t1.alignCenter(0, t2, 0)
camera.zoomToObjects(t1, t2)
def tr = TransformMathExpression.make(4, t1, t2)
tr.map(0, 0).setTransformStyle(MathTransformStyle.FLIP_HORIZONTALLY)
tr.map(1, 1).setTransformStyle(MathTransformStyle.FLIP_VERTICALLY)
tr.map(2, 2).setTransformStyle(MathTransformStyle.FLIP_BOTH)
tr.map(3, 3)//This one will use the default INTERPOLATE style
play.run(tr)
scene.waitSeconds(2)
Automatic color assignment
Since version 0.9.11, there is a convenient method to automatically assign colors to the shapes according to the mapping structure. This is done with the method autoColorShapes:
def t1 = LatexMathObject.make(r"$x+2=0$")
def t2 = LatexMathObject.make(r"$x=-2$")
t2.alignCenter(1, t1, 3)
camera.zoomToObjects(t1, t2)
def tr = TransformMathExpression.make(4, t1, t2)
tr.map(0, 0)
tr.map(3, 1)
tr.map(1, 2)
tr.map(2, 3)
tr.autoColorShapes()//Automatically assigns colors
play.run(tr)
scene.waitSeconds(2)
By default, this method uses a predefined color scheme. You can pass a ColorScheme object to use a custom palette. This method is very useful to quickly visualize the mapping structure.
Animated group mappings
When using group mappings, you can activate an additional animation effect where each "copied" glyph gets a different color during the transformation. This is done with the method animateGroupMappings:
def t1 = LatexMathObject.make(r"$x$")
def t2 = LatexMathObject.make(r"$x+x+x+x+x$")
t1.center()
camera.adjustToAllObjects()
def tr = TransformMathExpression.make(3, t1, t2)
tr.mapGroup(0, 0, 2, 4, 6, 8)
tr.animateGroupMappings()
play.run(tr)
scene.waitSeconds(2)
Note that this effect is automatically applied when you use the autoColorShapes() method.
Adding effects to the animation
As with other animations we have seen, you can add effects to each individual mapping. For example, you can add a jump effect:
def t1 = LatexMathObject.make(r"$x+2=0$")
def t2 = LatexMathObject.make(r"$x=-2$")
t2.alignCenter(1, t1, 3)
camera.zoomToObjects(t1, t2)
def tr = TransformMathExpression.make(4, t1, t2)
tr.map(0, 0)
tr.map(3, 1)
tr.map(1, 2).addJumpEffect(t1.getHeight())
tr.map(2, 3)
play.run(tr)
scene.waitSeconds(2)

Or a rotation effect:
tr.map(0,2).addRotateEffect(-1)
Or a scale effect:
tr.map(0,2).addScaleEffect(.5)
Here is an example with a jump effect only:
def t1 = LatexMathObject.make(r"$a+b=c$")
def t2 = LatexMathObject.make(r"$c=a+b$")
t1.alignCenter(3, t2, 1)
camera.zoomToObjects(t1, t2)
def tr = TransformMathExpression.make(4, t1, t2)
tr.map(0, 2).addJumpEffect(t1.getHeight())
tr.map(2, 0).addJumpEffect(t1.getHeight())
tr.map(1, 3)
tr.map(3, 1)
tr.map(4, 4)
play.run(tr)
scene.waitSeconds(2)
We use the method getHeight() to get the actual height of the formula, which will be the height of the jumps.
And, finally, you can nest any of these effects:
tr.map(0,2).addJumpEffect(.1).addRotateEffect(-1).addScaleEffect(.5);
tr.map(2,0).addJumpEffect(.1).addRotateEffect(1).addScaleEffect(.5);
Shapes marked for removal or adding
Any shape whose index is not mapped to a destination index or group is marked for removal. Currently, there are 6 types, defined in the enum TransformMathExpression.RemoveType: FADE_OUT, SHRINK_OUT, MOVE_OUT_UP, MOVE_OUT_LEFT, MOVE_OUT_RIGHT, MOVE_OUT_DOWN.
Similarly, any destination shape that is not mapped by an origin index or group is marked for adding with one of the following ways, defined in the enum TransformMathExpression.AddType: FADE_IN, GROW_IN, MOVE_IN_UP, MOVE_IN_LEFT, MOVE_IN_RIGHT, MOVE_IN_DOWN.
By default, FADE_OUT and FADE_IN are chosen for removing and adding. With the setRemovingStyle and setAddingStyle methods we can define individually the style for each shape.
We'll show all of this in one single, beautiful, self-explanatory, dizzying animation:
def t1 = LatexMathObject.make(r"$a^2=a\cdot a$")
def t2 = LatexMathObject.make(r"$3^2=3\cdot 3$")
t1.alignCenter(2, t2, 2)//Move t1 so its equal sign (glyph 2) matches the t2 equal sign (glyph 2)
camera.zoomToObjects(t1,t2)
def tr = TransformMathExpression.make(5, t1, t2)
tr.map(0, 0).setTransformStyle(MathTransformStyle.FLIP_HORIZONTALLY)//The first "a"
tr.map(1, 1) //default transform style is interpolation
tr.map(2, 2)
tr.map(3, 3).setTransformStyle(MathTransformStyle.FLIP_VERTICALLY)//The second "a"
tr.map(4, 4)
tr.map(5, 5).setTransformStyle(MathTransformStyle.FLIP_BOTH)//The third "a"
play.run(tr)
scene.waitSeconds(3)
And finally, we show how the initial animation will look applying colors, mapping, and effects (again, this is not the optimal way from the didactic point of view):
def t1 = LatexMathObject.make(r"$x+2=0$")
def t2 = LatexMathObject.make(r"$x=-2$")

//Add some colors
t1.setColorToIndices("darkolivegreen", 0)
t2.setColorToIndices("darkolivegreen", 0)
t1.setColorToIndices("maroon", 2)
t2.setColorToIndices("maroon", 2, 3)

t2.alignCenter(1, t1, 3)//Align centers (the equal signs)
camera.zoomToObjects(t1, t2)


//Define the animation and its parameters
def tr = TransformMathExpression.make(5, t1, t2)
tr.map(0, 0)//Transforms orig-shape 0 to dst-shape 0
tr.map(1, 2)
    .addJumpEffect(t1.getHeight())
    .setTransformStyle(MathTransformStyle.FLIP_VERTICALLY)//Transforms using a vertical flip orig-shape 1 to dst-shape 2 and adds a jump effect with the height of t1
tr.map(2, 3)
    .addJumpEffect(t1.getHeight())//Transforms orig-shape 2 to dst-shape 3 and adds a jump effect with the height of t1
tr.map(3, 1);//Transforms orig-shape 3 to dst-shape 1
tr.setRemoveStyle(MathRemoveStyle.SHRINK_OUT, 4)

//Finally, play it and enjoy!
play.run(tr)
scene.waitSeconds(3)
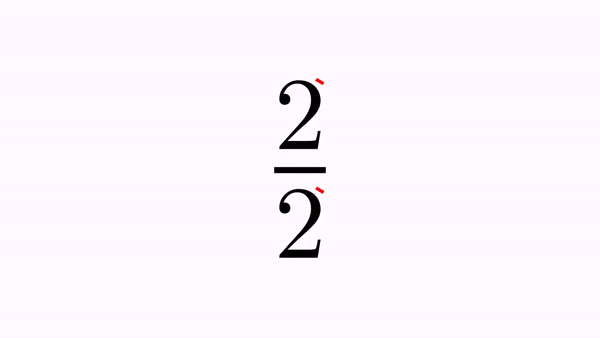
Cross out of parts of a formula
Since version 0.9.5, JMathAnim includes another animation that can be handy for manipulating equations called CrossOutMathElements. These animations, as their name suggests, cross out parts of a mathematical formula. Let's see a simple example:
def formula = LatexMathObject.make(r"$2\over 2$")
scene.add(formula)
camera.zoomToAllObjects()
def anim = CrossOutMathElements.make(1,//In 1 second...
    formula, ///for this formula...
    0, 2//cross out glyphs 0 and 2
)
play.run(anim)
scene.waitSeconds(1)
Here is a GIF from the movie generated:
You can define which elements to cross out as usual, specifying the indices. There are 2 ways:
.addSmallCrosses(int...indices) generates one cross out for each individual glyph given by the index. This is the default behaviour for the static builder, so another way to get the same result as before would be:
def anim=CrossOutMathElements.make(1, formula)
anim.addSmallCrosses(0,2)//Cross out glyphs 0 and 2
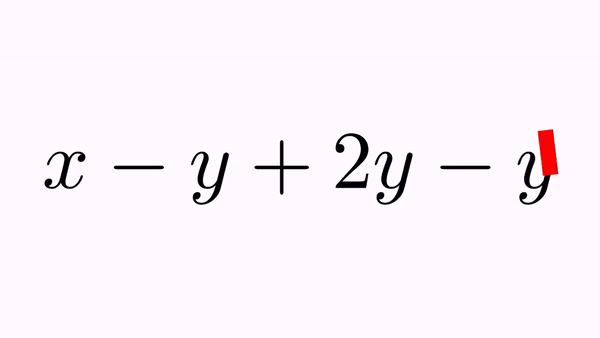
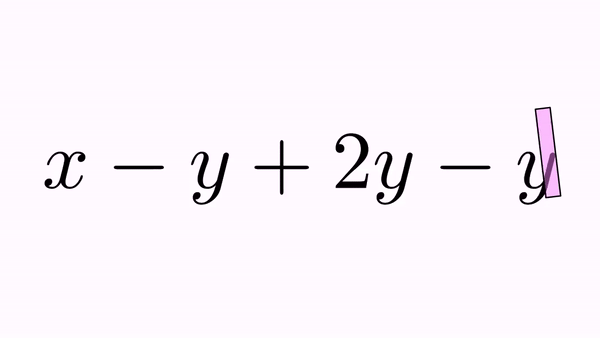
.addBigCross(int...indices) generates only one cross out that extends over all specified glyphs. For example:
def formula = LatexMathObject.make(r"$x-y+2y-y$");
scene.add(formula)
camera.zoomToAllObjects()
def anim = CrossOutMathElements.make(1, formula)
anim.addBigCross(1, 7)//A "big" cross out for -y+2y-y
play.run(anim)
scene.waitSeconds(1)
You can set appearance parameters for the drawn cross through the getMp() method defined in the animation. For example, if you want the cross out in the previous example to have 50% opacity and a black border, you can add the following lines to the previous code right before the play.run command:
anim.getMp().setFillColor(JMColor.parse("violet"))
            .setFillAlpha(.5)
            .setDrawColor(JMColor.parse("black"))
            .setThickness(10d)
anim.crossRatioWidth(.1)//Width of cross out is 10% of length (default value is 5%)
By default, all cross outs made to a formula become part of that formula. In the previous example, the big, violet cross out adds itself to the formula at the first free index, which is 8. This way, you can use them in further animations.
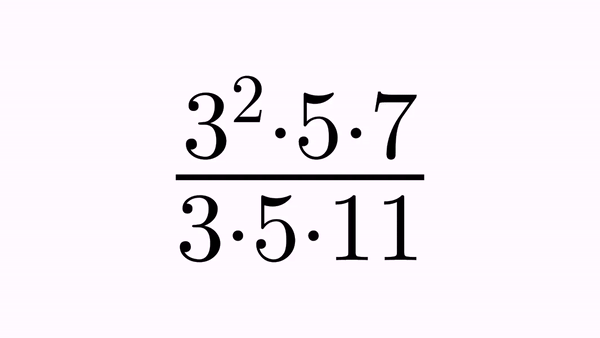
Another example, where we use 2 CrossOutMathElements animations, one with a different color. The first animation adds 2 cross outs at positions 13 and 14, and the second at positions 15 and 16. Remember that, although map commands may seem confusing, using the formulaHelper beforehand makes things much clearer. We show here the indices of the formulas we are going to work with:

We want to perform a simplification, crossing out the exponent of the 3 in the numerator with the 3 in the denominator, and later the 5 glyphs on both sides, and finally perform a transform to the simplified formula, removing all crossed out components. That's what we do in the following code:
def eq1 = LatexMathObject.make(r"$3^2\cdot 5\cdot 7\over 3\cdot 5\cdot 11$").center()
def eq2 = LatexMathObject.make(r"$3\cdot 7\over 11$").center()
eq1.scale(4)
eq2.scale(4)
scene.add(eq1)
scene.waitSeconds(1)

//Cross out the exponent of numerator and the 3 of denominator (glyphs 1 and 7)
def cross1 = CrossOutMathElements.make(1, eq1, 1, 7)
cross1.getMp().loadFromStyle("solidred")
play.run(cross1)
scene.waitSeconds(.5)

//Cross out the 5 of numerator and denominator (glyphs 3 and 9)
def cross2 = CrossOutMathElements.make(1, eq1, 3, 9)
cross2.getMp().loadFromStyle("solidgreen")
cross2.addDelayEffect(.2)//this adds a delay so that the second cross starts with a small delay
play.run(cross2)

//Remove the crossed elements (transform into eq2)
scene.waitSeconds(1)
def anim = TransformMathExpression.make(2, eq1, eq2)
anim.map(0, 0)
anim.map(4, 1)
anim.map(5, 2)
anim.map(6, 3)
anim.map(11, 4)
anim.map(12, 5)
anim.setDefaultRemovingStyle(MathRemoveStyle.FADE_OUT)

//The crossed out parts (and the crosses themselves) are removed moving themselves up (numerator) or down (denominator)
anim.setRemoveStyle(MathRemoveStyle.MOVE_OUT_UP, 1, 3, 13, 15)
anim.setRemoveStyle(MathRemoveStyle.MOVE_OUT_DOWN, 7, 9, 14, 16)

play.run(anim)
scene.waitSeconds(1)