Examples gallery
The animations in this channel are mostly made with JMathAnim, except for some simple things made with PowerPoint. Kdenlive was used for video editing. In Spanish with English subtitles: El Taxista de Hardy
Function and its points with zero slope
A simple animation illustrating the updateable object PointOnFunctionGraph :
//Axes with unit marks from -2 to 2, both vertically and horizontally
//This object is automatically added to the scene
axes(range: [-2, 2])

//The function
def myFunction =
funcGraph(
      func: { x -> (x - 1) * (x + 1) * (x - .5)},
      style: [thickness: 3, drawColor: 'darkblue']
)
//The roots of f'(x)
def root1 = -0.4342585459107
def root2 = 0.767591879244

def xStart = -1

def A = pointOnGraph(
      x: xStart,
      graph: myFunction,
      style: "redcircle" //Predefined style for dot
)

def tangentLine =  line(
      a: A,
      b: A.getSlopePointRight(),
      style: [drawColor: 'darkgreen']
)

//First, we animate the creation of the objects
play.showCreation(myFunction)
play.fadeIn(A)
play.showCreation(tangentLine)

//Now we shift the point A to the first root and fadeIn a illustrative text and a marker point
play.shift(5, root1 - xStart, 0, A)
def marker1 = A.copy().dotStyle(DotStyle.CROSS)
    .drawColor("darkblue")

def text1 = latex(
    text: r"$$f'(x)=0$$",
    transform: [scale: .5],
    stack: [to: A, gaps: .1, destinyanchor: "upper" ],
)

play.fadeIn(2, text1, marker1)

//We do the same with the second root
play.shift(5, root2 - root1, 0, A)
def marker2 = A.copy()
    .dotStyle(DotStyle.CROSS)
    .drawColor("darkblue")

def text2 = latex(
    text: r"$$f'(x)=0$$",
    transform: [scale: .5],
    stack: [to: A, gaps: .1, destinyanchor: "upper" ],
)

play.fadeIn(2, text2, marker2)
play.shift(5, 1, 0, A)
scene.waitSeconds(3)
Taylor expansion of sin(x)
//Function definitions
public int factorial(int n) {
    int resul = 1
    for (int i = 1; i <= n; i++) {
        resul *= i
    }
    return resul
}

final DoubleUnaryOperator TaylorExpansionSin(int order) {
    return { double x ->
        double resul = 0d
        double potX = x
        int sign = 1
        for (int n = 0; n < order; n++) {
            int k = 2 * n + 1
            resul += potX / factorial(k) * sign
            sign = -sign
            potX *= x * x
        }
        return resul
    } as DoubleUnaryOperator
}

//Main script
int orderTaylor = 8
Axes axes = Axes.make()
axes.addXTicksLegend(r"$\pi$", PI, TickType.PRIMARY, 0)
axes.addXTicksLegend(r"$-\pi$", -PI, TickType.PRIMARY, 0)
axes.addXTicksLegend(r"$2\pi$", 2 * PI, TickType.PRIMARY, 0)
axes.addXTicksLegend(r"$-2\pi$", -2 * PI, TickType.PRIMARY, 0)
axes.generatePrimaryYTicks(-4, 4, 1)
scene.add(axes)
final double xmin = -2 * PI - .2
final double xmax = 2 * PI + .2
def sinFunction = FunctionGraph.make(t -> Math.sin(t), xmin, xmax)
    .thickness(25).drawColor("#682c0e")

camera.adjustToObjects(sinFunction)

play.showCreation(sinFunction)
scene.waitSeconds(1)

def taylor = new FunctionGraph[orderTaylor]
def texts = new LatexMathObject[orderTaylor]
for (int n = 1; n < orderTaylor; n++) {
    taylor[n] = FunctionGraph.make(TaylorExpansionSin(n), xmin, xmax)
        .drawColor("#153e90").thickness(15)
    texts[n] = LatexMathObject.make("Taylor order " + (2*n-1))
        .scale(3)
        .stack().withGaps(.2).toScreen(ScreenAnchor.UPPER_LEFT)
    texts[n]
        .color("#153e90")
        .layer(2)
}
final Rect r = texts[1].getBoundingBox().addGap(.4, .1)
Shape box = Shape.rectangle(r)
    .fillColor("white")
    .thickness(3)
    .layer(1)

play.showCreation(taylor[1], texts[1], box)
for (int n = 2; n < orderTaylor; n++) {
    scene.add(taylor[n - 1].copy()
            .thickness(1)
            .drawColor("gray")
    )
    Transform transformFunction = Transform.make(2, taylor[n - 1], taylor[n])
    Transform transformText = Transform.make(2, texts[n - 1], texts[n])
    play.run(transformFunction, transformText)
}
scene.waitSeconds(5)
You can see the video here.
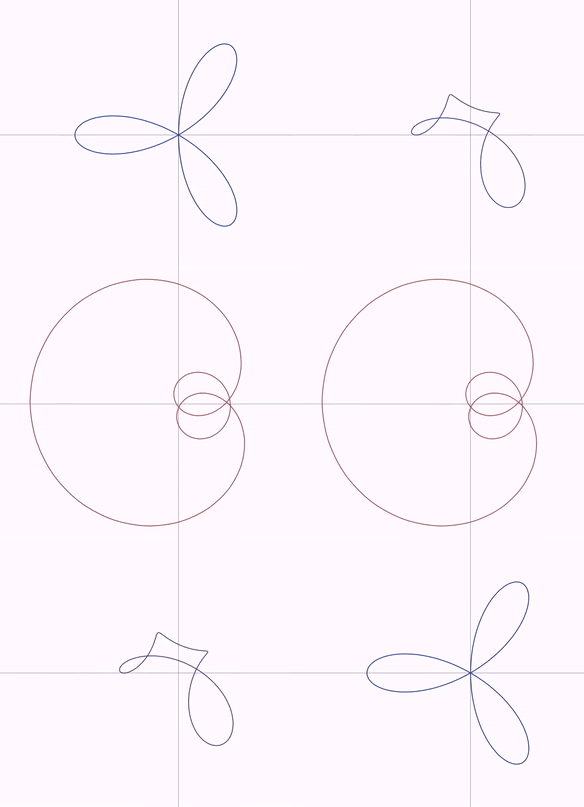
Trifolium into Freeth's Nephroid (and back)
Two parametric curves expressed in polar coordinates. Note that we made a copy of the first one as it becomes altered after the first transform.
axes()
def trifolium = parametricCurve(
    x: {t -> 2 * Math.cos(t) * (4 * Math.sin(t) * Math.sin(t) - 1)},
    y: { t -> t },
    coordinates: "polar",
    tRange: [0, PI],
    style: [drawColor: "#153e90", thickness: 15]
)
def nephroid = parametricCurve(
    x: { t -> 1 + 2 * Math.sin(t / 2)},
    y: { t -> t },
    tRange: [0, 4 * PI],
    coordinates: "polar",
    style: [drawColor: "#a05344", thickness: 15]
)

camera.adjustToObjects(trifolium, nephroid)
play.transform(2, trifolium, nephroid)
play.transform(2, nephroid, trifolium)
Here you have a GIF from the movie generated:
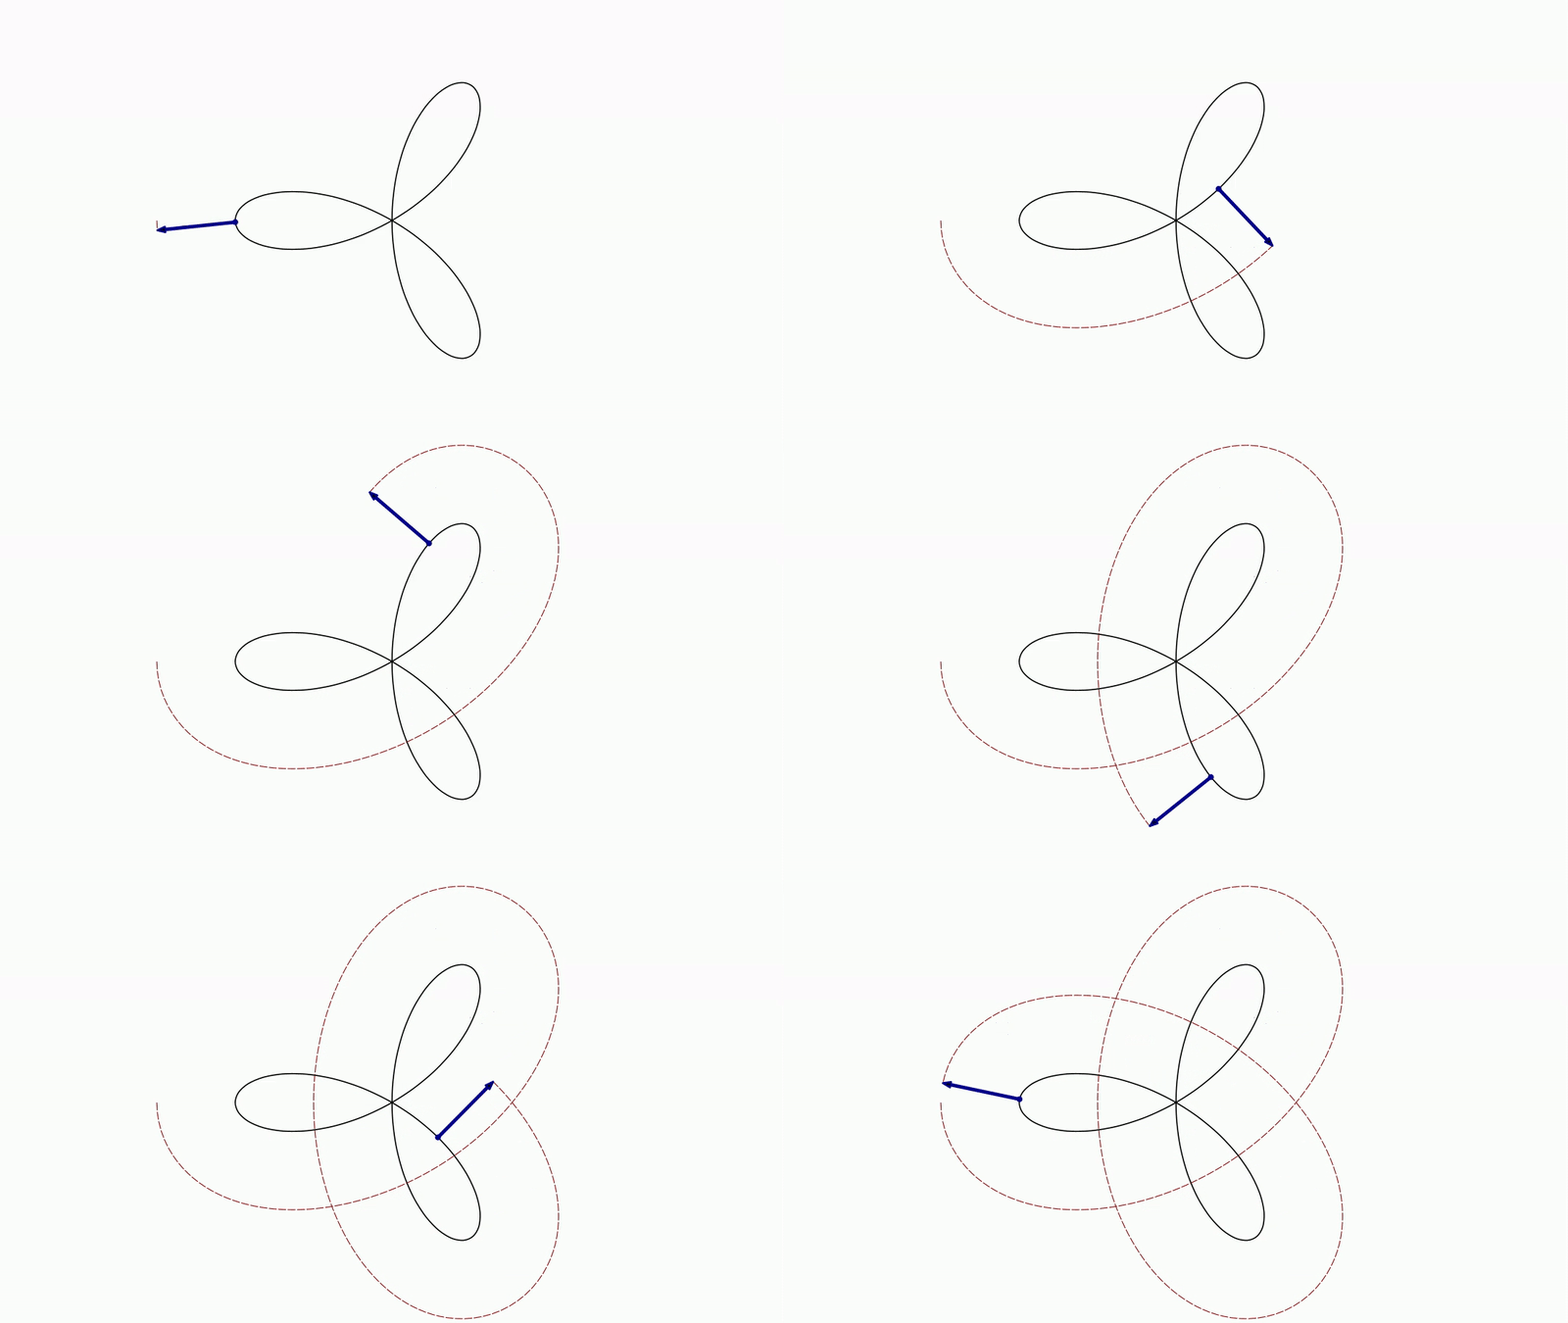
Trail curve derived from Trifolium
For each point of the Trifolium, we add the derivative vector rotated 90 degrees clockwise, and draw the trail. The animation is done with the advanceFrame() method, and we register an instance of CameraAlwaysAdjusting class to adjust the camera to all objects in the scene.
def trifolium = parametricCurve(
        r: { t -> 2 * Math.cos(t) * (4 * Math.sin(t) * Math.sin(t) - 1) },
theta: { t -> t },
trange: [0, PI],
style: [thickness: 15])

def pointOnCurve = point(style: [drawColor: "darkblue"], addToScene: true)
def pointToTrail = point()
def normalArrow = arrow(from: pointOnCurve, to: pointToTrail, head: "arrow1",
style: [drawColor: "darkblue"], layer: 1, addToScene: true)
def derivedCurve = trail(marker: pointToTrail,pen: "up",
style: [drawColor: "darkred", dashStyle: "dashed"],
addToScene: true)
        camera.scale(2.5)

def t = Scalar.make(0)
always(obj: pointOnCurve, dependsOn: t) { it.moveTo(trifolium(t)) }
always(obj: pointToTrail, dependsOn: [t, pointOnCurve]) {
    def normal = trifolium.getTangentVector(t.value, 1).normalize().rotate(-90 * DEGREES)
    it.moveTo(pointOnCurve.v + normal)
}

appear(runtime: 1, obj: trifolium)

derivedCurve.lowerPen()
derivedCurve.startHere() //On your marks!!
animScalar(obj: t, from: 0, to: PI, runtime: 15, lambda: "linear") //Go!!
Here you have a GIF from the movie generated:
The trail of the vertices of a square rotating over a line
def sq = shape(type: "square",
      transform: [scale: .2],
      stack: [screen: "left", originanchor: "lower_and_aligned_left"],
      addToScene: true)

line(a: [0, 0], b: [1, 0], addToScene: true)   //The "floor"

//Generate 4 Trail objects, one for each point of the square
["red", "blue", "green", "gray"].eachWithIndex { color, i ->
    trail(
          marker: sq[i],
          style: [drawColor: color, thickness: 15],
          addToScene: true
    )
}

logger.info("Like a rolling stone!")
30.times { k -> animRotate(
          obj: sq,
          center: sq[k + 1],
          angle: -90 * DEGREES, //or you can use angle: -PI/2 too
          runtime: .5,
          noLogs: true //there are many small animations, supress logs!
    ) }

scene.waitSeconds(1)
Here is a GIF from the movie generated:

The Koch curve
//Iteration: Take a Shape prev, make 4 copies s1...s4
//scale them 1/3, shift and rotate, and assemble them together
// If prev is "___" then nextKoch(prev) is something like "_/\_"
def nextKoch = { prev ->
    def s1 = prev.copy()
    def path = s1.getPath()
    path.scale(prev[0], 1 / 3d, 1 / 3d)
    def s2 = path.copy().rotate(s1[0], PI / 3) //Rotate 60 degrees and...
    s2.shift(s2[0].to(s1[-1]))//Move it to its last point (s1[-1])
    def s3 = path.copy().rotate(s1[0], -PI / 3)//Rotate -60 degrees and...
    s3.shift(s3[0].to(s2[-1]))//Move it to its last point of s2 (s2[-1])
    def s4 = path.copy()
    s4.shift(s4[0].to(s3[-1]))//Move it to its last point of s3 (s3[-1])

    return s1.merge(s2, true, false) //merge s1 with s2, connected s1-s2 but not s2-s1
        .merge(s3, true, false) //merge it with s3
        .merge(s4, true, false) //and now with s4
}

int numIters = 6

//kochList holds all the iterations
def kochList = [shape(type: "segment", from: [0, 0], to: [1, 0], style: [thickness: 1])]
while (kochList.size() < numIters) kochList << nextKoch(kochList[-1])

camera.zoomToObjects(kochList[-1])

for (i in 1..<kochList.size()) morph(from: kochList[i - 1], to: kochList[i], runtime: 3)

scene.waitSeconds(5)
You can see the video here.
The Hilbert curve
//Next iteration of hilbert is done scaling the previous to 50%,
//making 4 copies and merging them properly rotated and positioned
def nextHilbert = { box, previous ->
    def next = previous.copy()
    next.scale(box[1], .5, .5)
    //Creates a reflection about a diagonal of s1 and apply to it
    def bb = next.boundingBox
    AffineJTransform.createReflectionByAxis(bb.upperRight, bb.lowerLeft, 1).applyTransform(next)

    def s2 = previous.copy().scale(box[2], .5)
    def s3 = previous.copy().scale(box[3], .5)
    def s4 = previous.copy().scale(box[0], .5)

    //Reflection about the other diagonal
    def bb4 = s4.boundingBox
    s4.applyAffineTransform(AffineJTransform.createReflectionByAxis(bb4.lowerRight, bb4.upperLeft, 1))

    //Merge "next" with s2,s3,s4
    //First true parameters means "join first-to-second path"
    //Second false parameters measn "don't join second-to-first path"
    next.merge(s2, true, false)
        .merge(s3, true, false)
        .merge(s4, true, false)
}

int numIters = 1

def unitSquare = shape(type: "square",
      transform: [center: true, scale: [-1, 1]],
      style: [thickness: 1, drawColor: "#153e90", fillColor: "#FDFDFD"],
      addToScene: true)

def hilbert = (unitSquare /2).rotate(-90 * DEGREES)
hilbert[0].setSegmentToThisPointVisible(false)


camera.zoomToObjects(unitSquare)

numIters.times {
    def next = nextHilbert(unitSquare, hilbert)
    morph(from: hilbert, to: next, runtime: 2)
    hilbert = next
}

scene.waitSeconds(3)
You can see the video here.
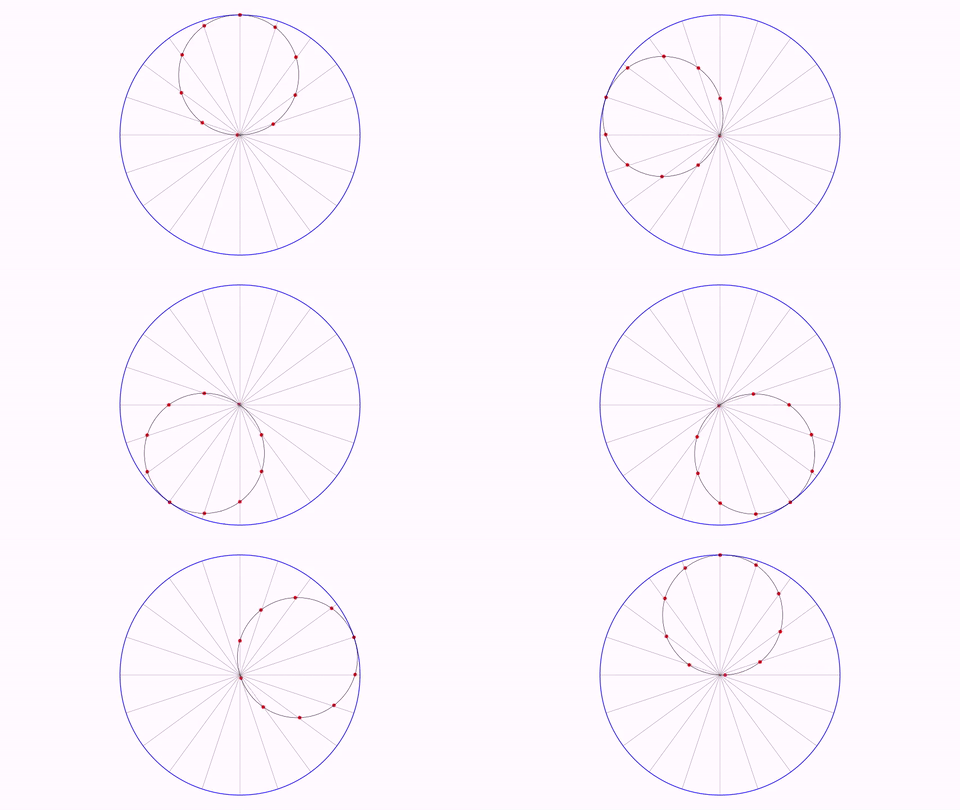
The Tusi couple
int numPoints = 10

//The outer circle, blue
def outerCircle = shape(type: "circle", style: [thickness: 15, drawColor: "blue"], addToScene: true)

//the init() method simply removes the last element of linspace(...)
//so we have "numPoints" numbers equally distributed from 0 to 0.5 (not including last one)
for (t in linspace(0,0.5,numPoints+1).init()) {
    shape(type: "segment", from: outerCircle(t), to: outerCircle(t + .5),
          style: [drawColor: "gray", thickness: 5], addToScene: true)
}

//The small circle, which is moving inside
def circleSmall = shape(type: "circle",
      transform: [scale: .5, shift: [0, .5]],
      style: [drawColor: "olive", thickness: 10])

def markers = linspace(0,1,numPoints+1).init()
    .collect {
    point(at: circleSmall(it),
          style: "redCircle")
}

//rotatingCircle is a group of objects (circleSmall and all markers)
def rotatingCircle = group(obj: [circleSmall] + markers, addToScene: true)

//This plays 2 animation in parallel:
//First animation moves rotatingCircle along a circular path of radius 50% of outerCircle
//Second animation rotates it (note the important useObjectState:false in the second one)
animGroup(anims: [
          animMoveAlongPath(obj: rotatingCircle, path: outerCircle / 2, parametrized: false,
                runtime: 10, lambda: "linear", run: false),
          animRotate(obj: rotatingCircle, angle: -2 * PI, runtime: 10, lambda: "linear",
                advanced: [useObjectState: false], run: false)
      ])
Here you have a GIF from the generated movie :
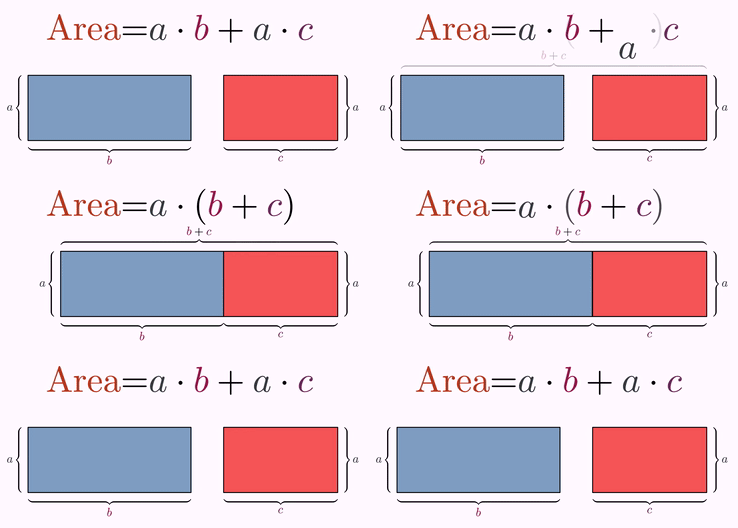
The distributive property
//Two rectangles
def sq1 = shape(type: "square",
      transform: [scale: [2.5, 1]],
      style: "solidblue",
      addToScene: true)
def sq2 = shape(type: "square",
      transform: [scale: [1.75, 1]],
      style: "solidred",
      stack: [to: sq1, destinyAnchor: "right", gaps: .5],
      addToScene: true)

//The colors chosen for the symbols a, b and c
def colA = JMColor.parse("#34403C")
def colB = JMColor.parse("#961A4C")
def colC = JMColor.parse("#6A2A5C")
def colArea = JMColor.parse("#B73A1C")

//Brace delimiters (brace is the default type). The vertical ones need rotation: "fixed",
//otherwise their labels appear rotated
delimiter(stackedTo: sq1, anchor: "lower", gap: .1,
      label: [text: r"$b$", color: colB],
      addToScene: true)
delimiter(stackedTo: sq1, anchor: "left", gap: .1,
      label: [text: r"$a$", color: colA],
      rotation: "fixed",
      addToScene: true)
delimiter(stackedTo: sq2, anchor: "lower", gap: .1,
      label: [text: r"$c$", color: colC],
      addToScene: true)
delimiter(stackedTo: sq2, anchor: "right", gap: .1,
      label: [text: r"$a$", color: colA],
      rotation: "fixed",
      addToScene: true)

//Brace over both rectangles: grouping them makes it adjust to the two combined.
//It is not added to the scene: it fades in during the animation
def textBC = latex(text: r"$b+c$",
      colorToIndices: [[colB, 0], [colC, 2]])   //"b" and "c" glyphs
def del12X = delimiter(stackedTo: group(obj: [sq1, sq2]),
      anchor: "upper", gap: .1,
      label: [object: textBC])

//The upper formula, Area = a*b + a*c, half an unit above sq2 (centered horizontally later)
def formula1 = latex(text: r"Area=$a\cdot b+a\cdot c$",
      transform: [scale: 3],
      stack: [to: sq2, destinyAnchor: "upper", gaps: .5],
      colorToIndices: [[colArea, 0..3], [colA, 5, 9], [colB, 7], [colC, 11]],
      addToScene: true)

//The same area written as a single product, Area = a*(b+c)
def formula2 = latex(text: r"Area=$a\cdot(b+c)$",
      transform: [scale: 3],
      colorToIndices: [[colArea, 0..3], [colA, 5], [colB, 8], [colC, 10]])

camera.adjustToAllObjects()

//Alignment goes after adjusting the camera: the "=" of formula2 over the one of formula1
formula1.hCenter()
formula2.alignCenter(4, formula1, 4)

//A copy of formula1, to play the animation backwards later
def formula3 = formula1.copy()

scene.waitSeconds(2)


//a*b + a*c  ->  a*(b+c)
def animEquation1 = mathTransform(//Edit this visually with Tools->Transform LaTeX
      from: formula1,
      to: formula2,
      runtime: 3,
      align: [4, 4],
      maps: [
          [orig: [5, 9], dst: 5, style: "interpolation", effects: [jump: 1.0, jumptype: "semicircle"]],
          [orig: [0, 1, 2, 3, 4, 6, 7, 8, 11], dst: [0, 1, 2, 3, 4, 6, 8, 9, 10], style: "interpolation"]
      ],
      run: false)

// a*(b+c) ->  a*b + a*c
//the method computeReverse computes the inverse mathTransform animation
def animEquation2 =animEquation1.computeReverse()


//First animation...
animGroup(anims: [
          animShift(obj: sq1, dx: .5, runtime: 3, run: false),
          appear(obj: del12X, type: "fadein", runtime: 3, run: false),
          animEquation1

          //c -> c
      ])
scene.waitSeconds(3)


//...and the same backwards
animGroup(anims: [
          animShift(obj: sq1, dx: -.5, runtime: 3, run: false),
          disappear(obj: del12X, type: "fadeout", runtime: 3, run: false),
          animEquation2
      ])
scene.waitSeconds(3)
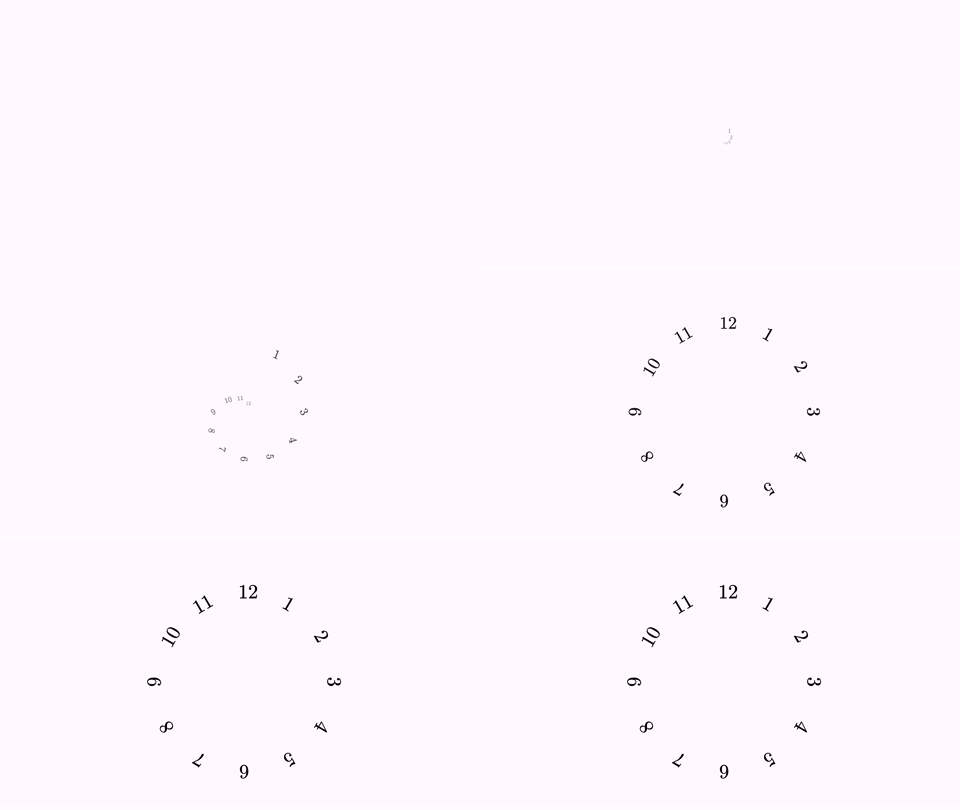
The Clock
This example shows how combining simple animations we can have complex ones. The total animation is done with a single playAnimation call.
double runtime = 5

//This shape holds the points where the numbers will lie
def destiny = shape(type: "circle", transform: [scale: .75, rotate: 90 * DEGREES])

//One combined animation per number. They are built with run: false and played together at the end
def numberAnims = []
for (n in 1..12) {
    //Take 12 points equally spaced inside the path 0, 1/12, 2/12,...11/12
    //We take them in reverse as the circle is built counterclockwise
    def sv = destiny.getVecAt(1d * (12 - n) / 12)

    //Each number begins centered at (0,0) and moves to a point of shape destiny, with a combined
    //animation of growing, shifting and rotating (note the useObjectState: false in the last two)
    def num = latex(text: "" + n, transform: [center: true])
    numberAnims << animGroup(
            anims: [
                    animShift(obj: num, vector: sv, runtime: runtime, run: false),
                    appear(obj: num, type: "growin", runtime: runtime, run: false,
                            advanced: [useObjectState: false]),
                    animRotate(obj: num, angle: sv.getAngle() - PI / 2, runtime: runtime, run: false,
                            advanced: [useObjectState: false])
            ],
            lambda: "smooth",
            run: false)
}

//The whole animation: each number staggered by 20% of the total time
//You can experiment changing the lambda, for example adding lambda: "bounce2"
animGroup(anims: numberAnims, delay: .2)
Here you have a GIF from the movie generated:
A Pythagoras Theorem proof
An animation with a background image and the shadow effect
Sum of the first odd numbers
Visual proof of the sum of the 9 first odd numbers Link to YouTube
And here with the 40 first odd numbers... Link to YouTube
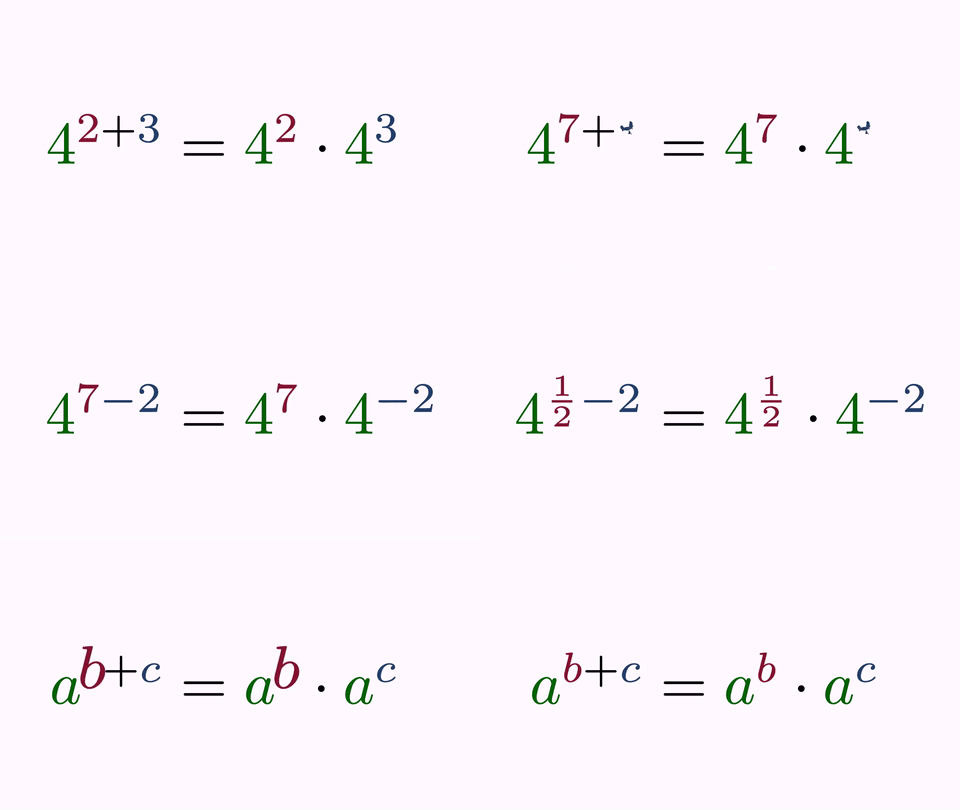
A property of powers
The map parameters may seem confusing to read, but the creation was pretty straightforward, using the formulaHelper method before to show the indices of each LatexMathObject instance:
//Same idea as TransformMathExpression.mapRange: one-to-one maps for a range of glyphs
def mapRange = { int from, int to, int dst -> (from..to).collect { [it, dst + it - from] } }

//Colors
def colA = JMColor.parse("darkgreen")
def colB = JMColor.parse("#84142d")
def colC = JMColor.parse("#1f4068")
def defaultColors = [[colA, 0, 5, 8], [colB, 1, 6], [colC, 3, 9]]

//One entry per step: the formula, the glyph aligned with the first one (the "=" sign, when it
//is not #4), its colors when they are not the usual ones, and where its glyphs come from
def steps = [
        [tex: r"$4^{2+3}=4^2\cdot 4^3$"],
        [tex: r"$4^{7+3}=4^7\cdot 4^3$", maps: mapRange(0, 9, 0)],
        [tex: r"$4^{7+1}=4^7\cdot 4^1$", maps: mapRange(0, 9, 0)],   //same glyph count, one to one
        [tex   : r"$4^{7-2}=4^7\cdot 4^{-2}$",
         colors: [[colA, 0, 5, 8], [colB, 1, 6], [colC, 2, 3, 9, 10]],
         maps  : mapRange(0, 8, 0) + [[orig: 9, dst: [9, 10]]]],     //the "3" becomes the two glyphs "-2"
        [tex   : r"$4^{ {1\over2}-2}=4^{1\over2}\cdot 4^{-2}$", align: 6,
         colors: [[colA, 0, 7, 12], [colB, 1, 2, 3, 8, 9, 10], [colC, 4, 5, 13, 14]],
         maps  : [[0, 0], [orig: 1, dst: [1, 2, 3], style: "flip_vertically"]] +
                 mapRange(2, 5, 4) +
                 [[orig: 6, dst: [8, 9, 10], style: "flip_vertically"]] +
                 mapRange(7, 10, 11)],
        [tex : r"$a^{b+c}=a^{b}\cdot a^{c}$",
         maps: [[0, 0], [orig: [1, 2, 3], dst: 1]] +                 //the 3 glyphs "1/2" become "b"
               mapRange(4, 7, 2) + [[orig: [8, 9, 10], dst: 6]] +
               mapRange(11, 12, 7) + [[orig: [13, 14], dst: 9]]]
]

def formulas = steps.collect { latex(text: it.tex, colorToIndices: it.colors ?: defaultColors) }
formulas.eachWithIndex { f, i -> if (i > 0) f.alignCenter(steps[i].align ?: 4, formulas[0], 4) }

camera.setGaps(.1, .1)
camera.zoomToObjects(*formulas)

steps.tail().eachWithIndex { step, i ->
    mathTransform(from: formulas[i], to: formulas[i + 1], runtime: 2, maps: step.maps)
    scene.waitSeconds(1)
}

//Highlight the "b" and then the "c" of the final formula
def last = formulas[-1]
highlight(obj: [last[1], last[6]], runtime: 1)
highlight(obj: [last[3], last[9]], runtime: 1)
scene.waitSeconds(3)
Here is a Gif from the movie generated:
Moving 3 coins
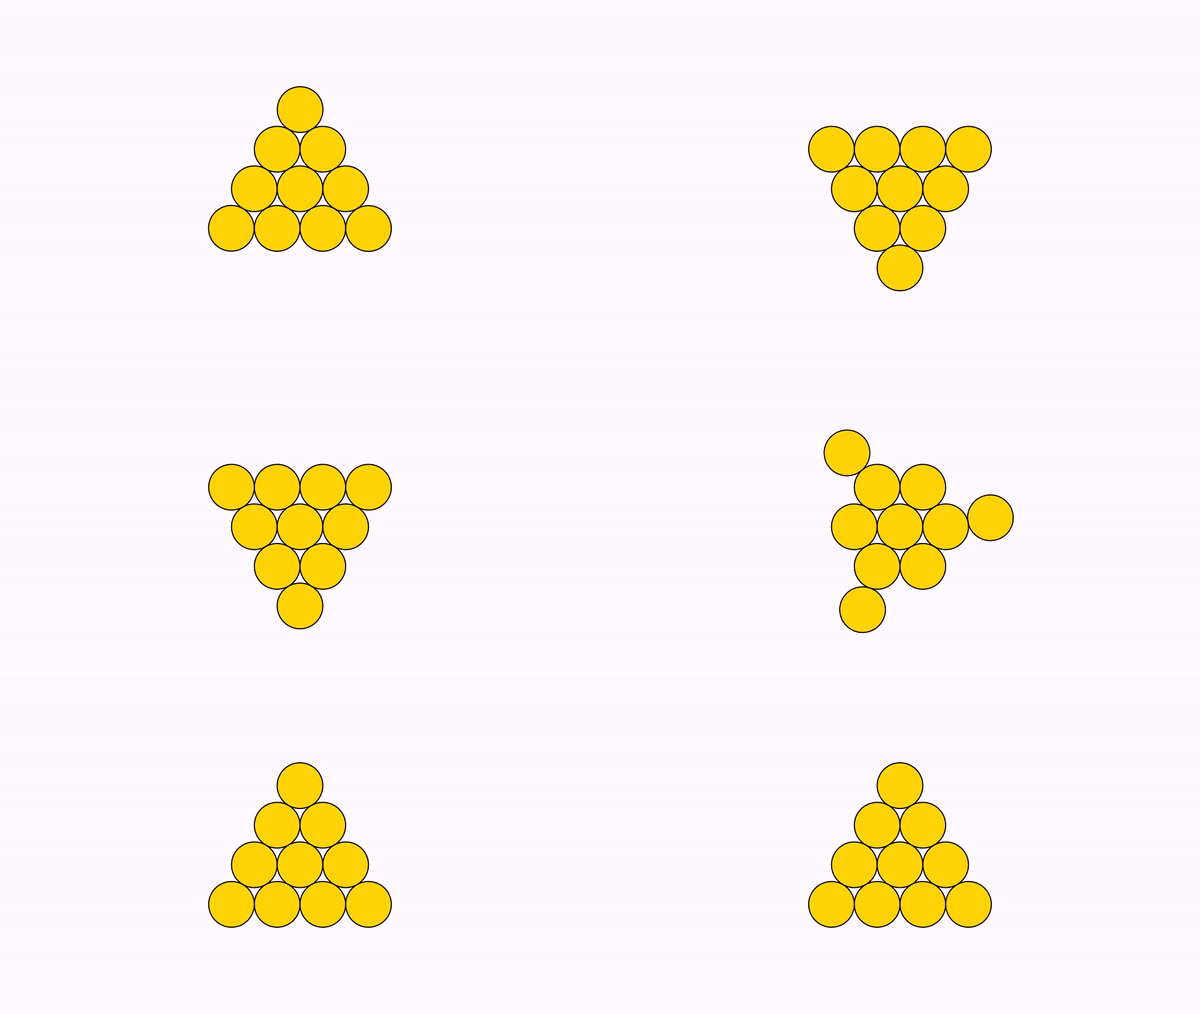
A solution for a simple puzzle. Can you invert the triangle moving only 3 coins?
def coinBase = Shape.circle().fillColor("gold").thickness(10)
def coin = new Shape[10]
for (int n = 0; n < 10; n++) {
    coin[n] = coinBase.copy()
}
double vertGap = Math.sqrt(3) - 2;//This negative gap is computed so that circles are tangent
def pyramid=MathObjectGroup.make(coin)
pyramid.setLayout(PascalLayout.make(Vec.to(0,0),0, vertGap))
scene.add(pyramid)
camera.adjustToAllObjects()
camera.scale(2)
//The number of coins:
//   0
//  1 2
// 3 4 5
//6 7 8 9
//To invert the pyramid, we need to:
//Rotate coin 6 around coin 3,
//rotate coin 9 around coin 8, and
//rotate coin 0 around coin 2
def anim1 = Commands.rotate(2, coin[3].getCenter(), -120 * DEGREES, coin[6])
def anim2 = Commands.rotate(2, coin[8].getCenter(), -120 * DEGREES, coin[9])
def anim3 = Commands.rotate(2, coin[2].getCenter(), -120 * DEGREES, coin[0])

play.run(anim1,anim2,anim3)
//Now they are arranged in this way:
//6 1 2 0
// 3 4 5
//  7 8
//   9
//So, we need to:
//Rotate coin 6 around coin 1,
//rotate coin 9 around 7, and
//rotate coin 0 around coin 5
//to invert the pyramid again

scene.waitSeconds(3);//Take a breath...

anim1 = Commands.rotate(2, coin[1].getCenter(), -120 * DEGREES, coin[6])
anim2 = Commands.rotate(2, coin[7].getCenter(), -120 * DEGREES, coin[9])
anim3 = Commands.rotate(2, coin[5].getCenter(), -120 * DEGREES, coin[0])

play.run(anim1, anim2, anim3)

scene.waitSeconds(3)
Here is a Gif from the movie generated:
A declaration of love
This example illustrates the transform animation between two multishape objects.
def text = LatexMathObject.make(r"I$\heartsuit$pentagons").center()
text.setColorToIndices(JMColor.parse("darkred"), 1);//Heart must be dark red

def pentagons = MultiShapeObject.make()
for (LatexShape sh : text) {//Iterates over the shapes
    //Creates a pentagon rotated with a random angle
    Shape pentagon = Shape.regularPolygon(5)
    pentagon.rotate(Math.random() * 2 * PI)
    AffineJTransform tr = AffineJTransform
        .createAffineTransformation(pentagon.getBoundingBox(), sh.getBoundingBox(), 1)
    //Transforms the pentagon so that fits in the bounding box of the current letter
    tr.applyTransform(pentagon)
    //Pentagon will be drawn and filled with a random color
    JMColor col = JMColor.random()
    pentagon.fillColor(col)
        .fillAlpha(.5)
        .drawColor(col)
    pentagons.add(pentagon)
}

camera.zoomToObjects(text)
play.transform(3, pentagons, text)
play.transform(3,  text, pentagons)

One thousand candies falling
This example explores the use of MathObjectGroupclass to handle large sets of objects
def candy = Shape.circle().scale(.03).thickness(2) // base shape for candy
def numCandies = 1000 // Number of candies to fall
def refPoint = Point.origin()

// Locates the refPoint at the bottom of the screen, leaving a margin the size of a candy
refPoint.stack().withGaps(candy.getHeight()).toScreen(ScreenAnchor.LOWER)

// Creates the group of candies
def candyHeap = MathObjectGroup.make()
for (def n = 0; n < numCandies; n++) {
    candyHeap.add(candy.copy().fillColor(JMColor.random()))
}

// Now we will layout this using a PascalLayout. We need a triangular number
// of candies to get a perfect triangular heap, so we will use an auxiliar group
// with the candies and fill it to get a triangular number
def triangularNumber = 0
def k = 0
while (triangularNumber < numCandies) {
    triangularNumber = k * (k + 1) / 2
    k++
}

def auxCandyHeap = MathObjectGroup.make()

// add the candies
auxCandyHeap.getObjects().addAll(candyHeap.getObjects())

// Now add the "virtual candies"
for (def n = 0; n < triangularNumber - numCandies; n++) {
    auxCandyHeap.add(candy.copy()) // Virtual candies, these will be discarded later
}

// Reverse the order, so that the virtual candies will be on top of the Pascal Layout
Collections.reverse(auxCandyHeap.getObjects())

def radius = .5 * candy.getHeight() // radius of a candy
def vgap = radius * (Math.sqrt(3) - 2) // negative gap so that the circles will stick together

// The reference point here is meaningless, we will align the group later
def layout = PascalLayout.make(Point.origin(), 0, vgap)
auxCandyHeap.setLayout(layout)
auxCandyHeap.stack().withDestinyAnchor(AnchorType.UPPER).toObject(refPoint)

// Note that we used auxCandyHeap only to set the layout of all elements of group candyHeap
// Now perform animations. We will shuffle all elements in each row
def anim = AnimationGroup.make()
def rows = layout.getRowGroups(auxCandyHeap)

Collections.reverse(rows.getObjects()) // Reverse the order of rows

def counter = 0
def rowCounter = 0

for (def r : rows) {
    def row = (MathObjectGroup) r
    Collections.shuffle(row.getObjects())

    // Now for each candy of the shuffled row, add a fall animation
    for (def candyToFall : row) {
        if (candyHeap.getObjects().contains(candyToFall)) { // if not an auxiliar candy...
            def conc = Concatenate.make()
            final def wt = 2d * counter / candyHeap.size()
            conc.add(WaitAnimation.make(wt))
            conc.add(
                Commands.moveIn(
                    1 - .9 * rowCounter / rows.size(),
                    ScreenAnchor.UPPER,
                    candyToFall
                ).setLambda(t -> t * t)
            )
            anim.add(conc)
            counter++
        }
    }
    rowCounter++
}

play.run(anim)
scene.waitSeconds(3)
Showing the divisibility of a number with candies
The animation of the candies allocating in the band is done with a single setLayout animation, with a jump effect with semicircular path and a delay effect of 0.5
You can see a video of the animation here (note: the title of the video should say "7" instead of "9").
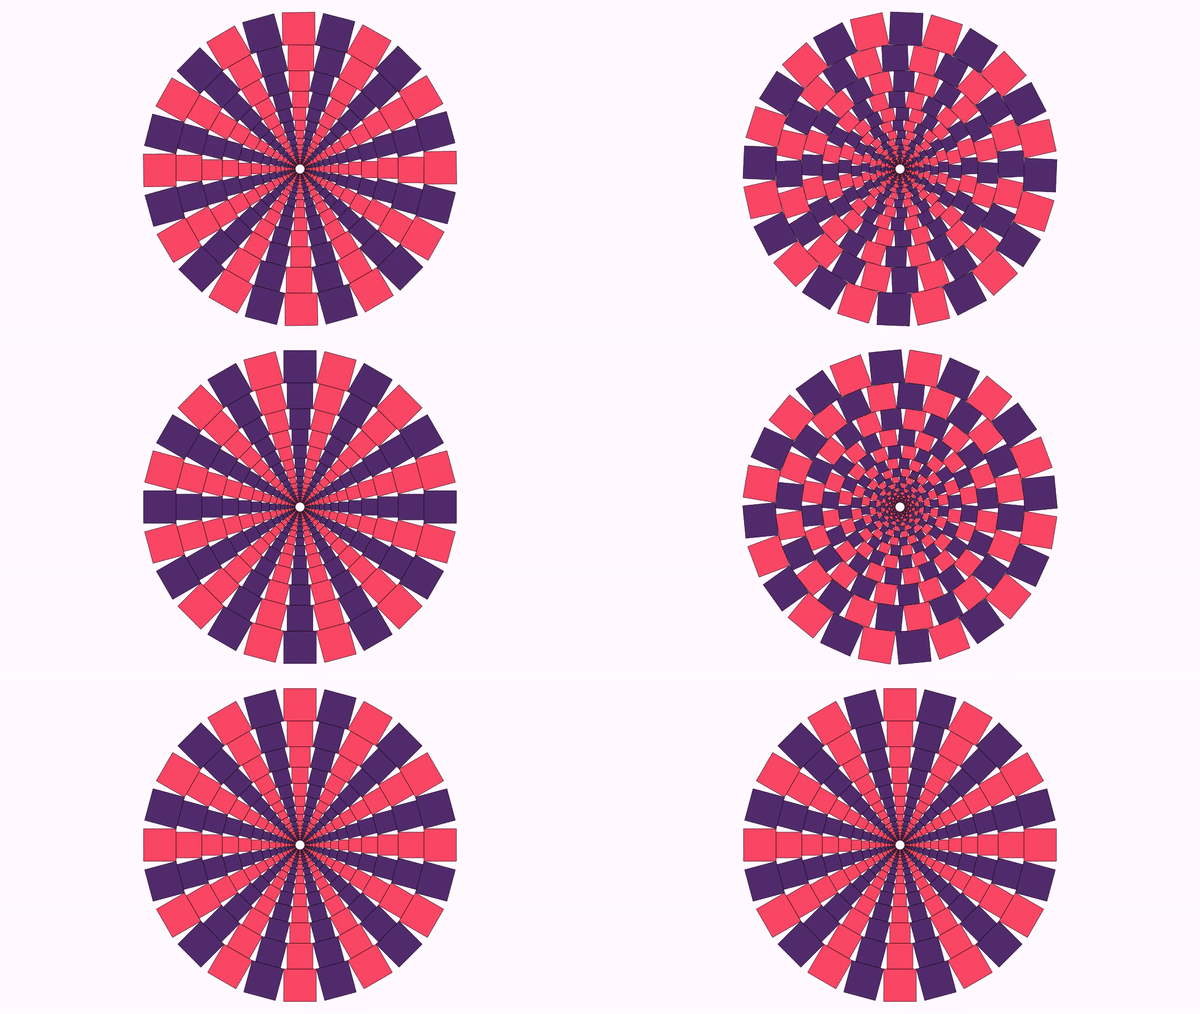
Concentric circles that appear and disappear
This animation show how using the MathObjectGroup class can achieve interesting effects easily.
def numberSmallSquares = 24 // 24 squares in each circle
def numberConcentricCircles = 15 // 15 concentric circles

// This is the side length of a regular polygon
// circumscribed in a unit circle
def scaleSmallSquare = 2 * Math.tan(PI / numberSmallSquares)

// Creates a base shape (a square, that can be changed)
// and put it to the right of the point (1,0)
def baseShape = Shape.square().scale(scaleSmallSquare)
baseShape.stack().withOriginAnchor(AnchorType.LEFT).toPoint(1, 0)

// Colors to alternate in base shape
def col1 = JMColor.parse("#512D6D")
def col2 = JMColor.parse("#F8485E")

// Each concentric circle is a MathObjectGroup
def circles = new MathObjectGroup[numberConcentricCircles]

// Create the first MathObjectGroup, the outer circle
def delta = 2 * PI / numberSmallSquares
circles[0] = MathObjectGroup.make()

def useFirstColor = false
for (def n = 0; n < numberSmallSquares; n++) {
    def smallSquare = baseShape.copy().fillColor(useFirstColor ? col1 : col2)
    smallSquare.rotate(Point.origin(), delta * n)
    circles[0].add(smallSquare)
    useFirstColor = !useFirstColor
}

// Create the next MathObjectGroups recursively, scaling appropriately
def scale = 2d
for (def k = 1; k < circles.length; k++) {
    circles[k] = circles[k - 1].copy().scale(scale / circles[k - 1].getWidth())
    scale *= scale / circles[k - 1].getWidth()
}

// Add everything to the scene. If you add an array, each element of this array
// will be added to the scene
scene.add(circles)
camera.adjustToAllObjects()

// Time to create animations, each one a rotation with alternating direction
def ag = AnimationGroup.make()
def reverse = false

for (def k = 0; k < circles.length; k++) {
    ag.add(
        Commands.rotate(
            1, // 1 second
            Vec.to(0, 0), // Rotation center
            (reverse ? -delta : delta), // angle
            circles[k] // Object to rotate
        )
    )
    reverse = !reverse
}

ag.setLambda(t -> t) // Linear movement
play.run(ag) // Play...
scene.waitSeconds(1) // Wait...
play.run(ag)
scene.waitSeconds(1) // Wait...and done!
Here is a GIF from the movie generated:
A Truchet tiling
An example showing how to generate a simple MathObjectGroup (a Truchet tile) and use the setLayout method to tile the plane. Add a zoom out and rotate effect to generate the optical illusion that the image is still rotating after the animation is finished.
private def makeTruchet(boolean turn) {
    def truchetTile = MathObjectGroup.make()

    // This commented line added the outline of the tile. You can uncomment it
    // to see the difference
    // truchetTile.add(Shape.square().drawColor("violet").fillColor("white"))

    // A quarter circle, with radius 1
    def a = Shape.arc(.5 * PI)

    // 2 copies, scaled around center of the arc
    def width = .375
    def inner = a.copy().scale(Point.origin(), .5 - width * .5, .5 - width * .5)
    def outer = a.copy().scale(Point.origin(), .5 + width * .5, .5 + width * .5)

    // Merge inner and reversed outer shape, connecting both ends
    inner.merge(outer.reverse(), true, true)

    truchetTile.add(
        inner,
        inner.copy().rotate(Point.at(.5, .5), PI)
    )

    if (turn) { // Rotate the tile 90 degrees
        truchetTile.rotate(.5 * PI)
    }

    return truchetTile
}


def truchets = MathObjectGroup.make()
def size = 44 // A square of 44 rows/columns
final def numTiles = size * size
final def rowSize = size

for (def k = 0; k < numTiles; k++) {
    def rand = (Math.random() < .5)
    truchets.add(makeTruchet(rand))
}

truchets.setLayout(BoxLayout.make(rowSize)).center()
scene.add(truchets)

// A radial gradient, centered at origin and relative to screen
def grad = JMRadialGradient.make(
    truchets.getCenter(),
    truchets.getHeight() * .5
)

grad.setRelativeToShape(false)
grad.add(0, JMColor.parse("#EEEEEE"))
grad.add(1, JMColor.parse("#FF5722"))

// Both draw and fill colors with this gradient
truchets.fillColor(grad).drawColor(grad)

camera.setMathXY(-1, 1, 0)

play.run(
    Commands.rotate(20, 4 * PI, truchets).setLambda(t -> t),
    Commands.cameraScale(20, camera, 20).setLambda(t -> t)
)
scene.waitSeconds(5)// In this 5 seconds you will think that the picture is still moving :-)
You can see the generated video here